Download Canon Service Tool v.2000
Service Tool v.2000 is an updated version of Service Tool v.1081. Service Tool v.1081 was released in June 2010 while Service Tool v.2000 is expected to be released in September 2010. Service Tool v.2000 added a new function, namely: Set Time (Time setting), PTT Parameter Mode In (Entry in the PTT parameter mode), Ink Sensor (Pressure sensor correction), Head Temp Sensor (Print head diode sensor correction).
About Canon Service Tools
- Service Tool is a portable application.
- Only supports Windows Operating System. If your PC/Laptop uses an OS other than Windows, please read the following link Open Service Tool from Another OS.
- The printer driver must have been installed on the PC/Laptop. The Service Tool cannot be used if the driver is installed in an auto-detect (plug and play) manner. Please download the printer driver on the official Canon website, then install the driver on your PC/Laptop.
- Use a USB cable connection. The Service Tool cannot be used if the printer is connected to a PC/Laptop with a wireless connection.
- Service Tool can be used to reset the printer if the printer is in Service Mode.
- Use the Service Tool according to the instructions in the Service Manual.
- If the Service Tool does not support the requested operation, or if the Service Tool does not support the printer, an error message will appear on the screen.
When should the printer be reset?
Service Tool is software used to reset the printer. The printer must be reset if:
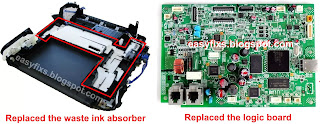
- Replaced the waste ink absorber. Waste ink absorber is replaced when a "Waste ink absorber full" error occurs with support code/error codes: 1700, 1701, 1702, 1703, 1704, 1705, 1712, 1713, 1714, 1715, 5B00, 5B01, 5B02, 5B03, 5B04, 5B05, 5B10, 5B11, 5B12, 5B13, 5B14, 5B15.
- Replaced the logic board. If the printer repair is eventually replaced with a logic board, after the new logic board is installed, the printer must be reset.
Example
At full waste ink absorber error with error code 1700/5B00. Resetting the waste ink counter value to zero (D value is reset to zero) is effective if the waste ink absorber is replaced. If the D value is reset to zero but the waste ink absorber is not replaced, in the near future, waste ink will overflow from inside the printer. Resetting the D value to zero becomes effective if the waste ink absorber is replaced.
Supported Printers
Referring to the information in the Canon printer Service Manual, Service Tool v.2000 supports the printer:
- Canon MX880 series: Pixma MX880, MX882, MX883, MX884, MX885, MX886, MX888
- Canon iX6500 series: Pixma iX6500, iX6510, iX6520, iX6540, iX6550, iX6560, iX6570, iX6580 (Overseas), Pixus iX6530 (Japan)
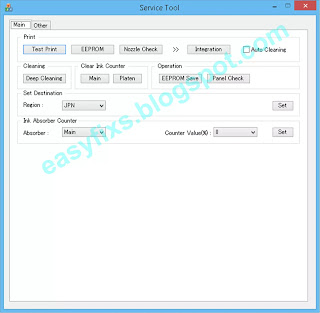
The function of the buttons in the Canon Service Tool v.2000
1. Main2. Other
1. Main
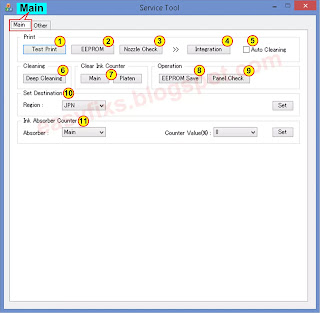
1. Test Print
Function: Service test printRemarks: Paper will feed from the rear tray (2 sheets). Printed items: Model name, ROM version, USB serial number, Process inspection information, Barcode (model name + destination + machine serial number), Ink system function check result, DVD / CD sensor check result (not applicable to the MX880 series)
2. EEPROM
Remarks: The dialog box opens to select the paper source. Select Rear tray or Cassette, and click OK. Printed items: Model name, ROM version, Ink absorber counter value, Print information, Error information, etc.
3. Nozzle Check
Remarks: The dialog box opens to select the paper source. Select Rear tray or Cassette, and click OK. The same pattern as the one in the user mode is printed.
4. Integration
Remarks: Paper will feed from the rear tray (if the cassette is selected, the error is displayed). Multiple inspection items are printed just in one page, thus it is recommended to use this function for the standard inspection. Printed items: Model name, ROM version, USB serial number, Nozzle check pattern (same as the one in the user mode), Process inspection information, Barcode (machine serial number), Ink system function check result, DVD / CD sensor check result.
5. Auto Cleaning
Remarks: Automatic print head cleaning prior to printing (after replacement of an ink tank or the print head). Select this option to enable the cleaning.
6. Deep Cleaning
Remarks: Cleaning of both Black and Color at the same time (same as the one in the user mode)
7. Clear Ink Counter
Clear Ink Counter - Main
Remarks: Set a sheet of A4 or Letter sized plain paper. After the ink absorber counter is reset, the counter value is printed automatically.
Function: Platen ink absorber counter resetting
Remarks: Not used.
8. EEPROM Save
Remarks: The EEPROM information (same as the one in EEPROM information print) is displayed on the PC or is saved to the PC as a text file. This function is not available in most cases of errors.
9. Panel Check
Remarks: Button and LCD test
10. Set Destination
Remarks: ASA (Asia), AUS (Australia), BRA (Brazil), CHN (China), CND (Canada), EMB, EUR (Europe), JPN (Japan), KOR (Korea), LTN (Latin), TWN (Taiwan), USA (United States)
11. Ink Absorber Counter
Remarks: Ink absorber counter setting
2. Other
Remarks: Not used.
13. CD-R Correction
Remarks: Not used.
14. Print (LF/ EJECT Correction)
Remarks: Perform LF / Eject correction only when streaks or uneven printing occurs after the repair.
15. LF/ EJECT Correction
Remarks: Set the correction value based on the printed pattern (14. LF/EJECT correction pattern print).
16. Auto LF/EJ (1)
Remarks: Not used.
17. Auto LF/EJ (2)
Remarks: Not used.
18. Left Margin Correction
Remarks: Not used.
19. Set Time
Remarks: Not used.
20. PTT Parameter Mode In
Remarks: Entry in the PTT parameter mode is allowed when this button is clicked.
21. Ink Sensor
Remarks: Not used.
22. Head Temp Sensor
Remarks: Not used.
23. Wetting Liquid Counter
Remarks: Not used.
24. Panel Rank
Remarks: Not used.
25. Flatbed Scanner
Remarks: Not used.
How to use Service Tool v.2000
1. Enter Service Mode
2. Reset the waste ink counter
1. Press and hold the Stop/Resume/Cancel button (keep the Stop/Resume/Cancel button pressed and don't release it) then,
2. Press and hold the Power/ON button (keep pressing the Power/ON button and do not release it.) Look at the Power/ON LED, if the Power/ON LED turns green/blue it means procedures 1 and 2 have been carried out correctly.
3. Release the Stop/Resume/Cancel button, while the Power/On button is still being held, then
4. While holding down the Power/On button, press the Stop/Reset/Resume/Cancel button 5 times (read Note), then release the Power/ON button. Wait a few moments, the Power/ON LED will flash and finally turn green/blue. If the Power/ON LED turns green/blue, it means that the printer has entered Service Mode.
Note
- After following the procedure above, if the Power/ON LED turns green/blue and doesn't blink, it means the printer has entered Service Mode.
- After following the procedure above, if the Power/ON LED flashes green/blue it means the printer failed to enter Service Mode. Please turn off the printer, repeat the procedure above, and press the Stop/Reset/Resume/Cancel button 6 times (enter Service Mode without a scanner)
- Press the Stop/Reset/Resume/Cancel button 5 times (enter Service Mode with scanner), if this method fails, repeat the procedure above, and press the Stop/Reset/Resume/Cancel button 6 times (enter Service Mode without scanner).
- If you have tried the two methods above and the Power/ON LED continues to blink, it means the printer cannot enter Service Mode. Please read the following posts Canon Service Tool Error Code Mean and Canon Service Tools and Supported Printers for more information.
2. Reset the waste ink counter
- If the Power/ON LED lights up green/blue and doesn't blink, it means the printer has entered Service Mode. Follow the procedure below on how to reset the printer.
6. Extract the rar file then open the Service Tool.
7. Load A4 or Letter paper (5 sheets), then follow the procedure according to the image.
8. Print EEPROM (1) data. Wait a few moments, the printer will print the EEPROM data from the printer, then pay attention to the print out of the EEPROM data. The waste ink amount is symbolized in D.
Note
D is Main waste ink counter value. The waste ink absorber full error with support code 1700/5B00 is caused by a value of D=100.0 (maximum). Next we will reset the value of D to zero.
9. Clear Ink Counter - select Main (2) to reset the main ink absorbent counter. Wait a few moments, the printer will print D=000.0 in the upper left corner of the paper. D=000.0 means that the main ink absorbent counter is reset to zero.
10. Print the EEPROM (1) data again after the D value is reset, then compare the data EEPROM before and after reset. If the value of D after reset is D=000.0 it means that resetting the waste ink counter has been successful.
11. If all goes well, turn off the printer by pressing the Power/ON button. Wait about 15 seconds then turn the printer back ON. Done.
Notes
If you need another version of the Service Tool, please open the following link
- Service Tool v.1020 and Service Tool v.1030 - OPEN
- Service Tool v.1050 - OPEN
- Service Tool v.1071, Service Tool v.1072, Service Tool v.1073, Service Tool v.1074 - OPEN
- Service Tool v.1081 - OPEN
- Service Tool v.2000 - OPEN
- Service Tool v.3000 - OPEN
- Service Tool v.3400 - OPEN
- Service Tool v.3600 - OPEN
- Service Tool v.3900 - OPEN
- Service Tool v.4718 - OPEN
- Service Tool v.4720 - OPEN
- Service Tool v.4904, Service Tool v.4905, Service Tool v.4906, Service Tool v.4907 - OPEN
- Service Tool v.5103, Service Tool v.5105 - OPEN
- Service Tool v.5301, Service Tool v.5306 - OPEN
- Canon Service Tool Version - OPEN
- Reset Canon Printers Manually - OPEN
Questions and Answers
Q: When the "Ink absorber full" error occurs, what should I do?
A: All you have to do is reset the waste ink counter to zero, followed by replacing the waste ink absorber with a new one. If a new waste ink absorber is not available in the market, you can clean the ink absorber and use it again. Resetting the waste ink counter becomes effective when the waste ink absorber is replaced or cleaned.
Q: The Service Tool cannot be opened, or all buttons in the Service Tool are inactive, or an error code appears: 002, 005, 006 when using the Service Tool. What to do?
A: Complete information regarding this issue, please read the Canon Service Tool Error Code Mean (Error code: 002, 005, 006, 007, 009, etc)
Q: Where can I get other Canon Service Tools?
A: For complete information regarding Canon Service Tool collection, please open Canon Service Tool Version
Q: I don't know which Service Tool supports my printer, where can I get information about it?
A: For complete information regarding Canon printers and the Service Tools used, please open the Canon Service Tools and Supported Printers
Q: I don't know which Service Tool supports my printer, where can I get information about it?
A: For complete information regarding Canon printers and the Service Tools used, please open the Canon Service Tools and Supported Printers
If you have trouble trying to repair your printer yourself, we recommend asking a Canon Service Center or a printer repair professional for help.


Fabulous ! It worked.
ReplyDelete