How to disassemble Canon iP4600, iP4630, iP4640, iP4650, iP4660, iP4670, iP4680
Information below for Canon iP4600 series: Canon iP4600, iP4630, iP4640, iP4650, iP4660, iP4670, iP4680. For a complete discussion (7 chapters) regarding repairs to the Canon iP4600 series, please read Troubleshooting Canon iP4600 series.
Disassembling the printer during the printer repair process is the most common job. By disassembling the printer we will know which mechanism is not working normally. When a malfunction occurs, the printer will provide a warning in the form of an error message and an error code. These error messages and error codes are very useful for you to find out which part of the printer has a problem.
The error code on Canon printers is divided into 2 parts:
1. Operator Call Error code. This error code refers to errors that occur during the printer operation process, for example: errors in print operations, scanner, copy, fax, wifi, cartridges, paper jams, out of ink, etc. When an error is made in the operation of the printer, the printer will automatically display an error message on the LCD screen of the computer/printer. You can follow the instructions or solutions that appear on the screen so that you can immediately solve the problem that occurs. For a complete discussion regarding Operator Call Error Codes, please read Operator Call Error Canon iP4600 series.
2. Service Call Error code. This error code appears when a fault occurs in one of the printer parts. When a Service Call Error occurs, the LCD screen of the computer/printer only displays a message to immediately contact Canon Repair Service and on the LCD screen only the error code appears. For complete information on error codes for Service Calls please read Service Call Error Canon iP4600 series. Once you know the meaning of the Service Call Error Code, the repair will be more targeted and which part is broken can be fixed immediately.
All problems caused by Service Call Errors warrant disassembly of the printer. Disassembly of this printer is carried out to search for and find damaged spare parts according to the error code message that appears on the screen. For information regarding printer parts and spare parts serial numbers, please read External View and Parts List on Canon iP4600 series.
Here are the steps for repairing the printer:
1. Error Code. Find information regarding the error code that appears on the LCD screen of the computer/printer by matching the error code on the Service Call Error Canon iP4600 series or Operator Call Error Canon iP4600 series.
2. Spare Parts. If the damage leads to replacement or repair of spare parts, please read the External View and Parts List on Canon iP4600 series.
3. Replacement of Spare Parts. For information on how to disassemble the printer you can read the paragraph below.
Disassemble Canon iP4600 series
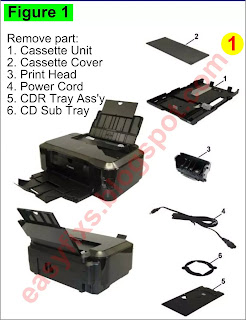
Figure 1. Remove the Packing Contents and Print Head
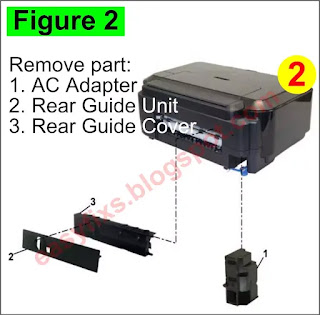
Figure 2. Remove the AC Adapter and Rear Guide Unit
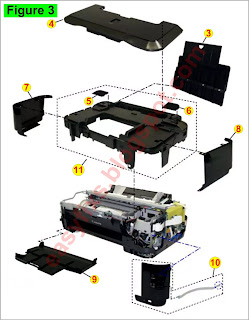
Figure 3. Remove the External Covers
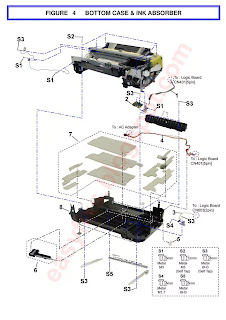
Figure 4. Remove the Bottom Case and Ink Absorber
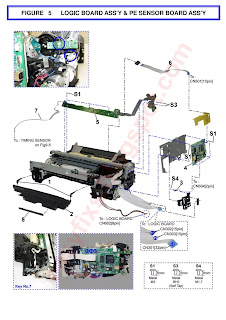
Figure 5. Remove the Logic Board Ass'y and PE Sensor Board Ass'y
Figure 6. Remove the Sheet Feed Unit
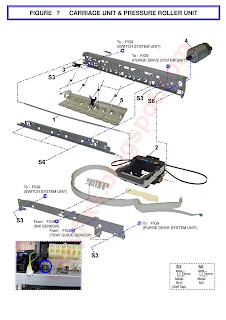
Figure 7. Remove the Carriage Unit and Pressure Roller Unit
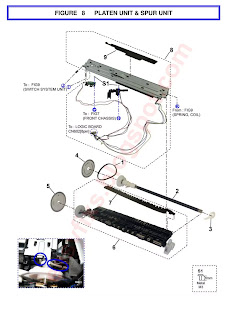
Figure 8. Remove the Platen Unit and Spur Unit
Figure 9. Remove the Purge Drive System Unit and Switch System Unit.
Figure 1. Remove the Packing Contents and Print Head
1. Remove the cassette unit (1), cassette cover (2), print head (3), power cord (4), CDR tray ass'y (5), CD sub tray (6).
Figure 2. Remove the AC Adapter and Rear Guide Unit
2. Remove the AC adapter (1), rear guide unit (2), rear guide cover (3).
Figure 3. Remove the External Covers
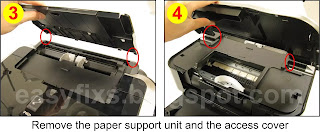
3, 4. Remove the paper support unit (3) and the access cover (4). While pushing both sides of the paper support unit and the access cover so that the center will be slightly curved, release the left and right boss.
5, 6. Remove the main case covers left (5a, 5b) and right (6a, 6b). Insert a flat screwdriver through the space under the main case cover and press the claw down. After that slide the main casing cover to the side to release it.
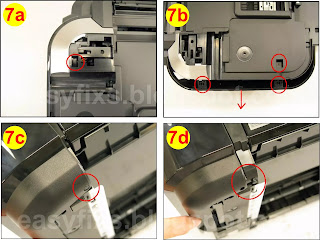
7. Remove the side cover left (7a - 7d).
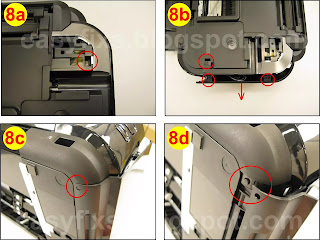
8. Remove the side cover right (8a - 8d).
9. Remove the front door unit (9). Bend the center of the paper output tray slightly downwards, then release the left and right bosses.
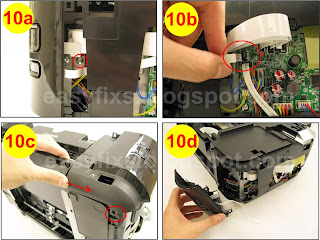
10. Remove the panel cover unit (10a - 10d).
11. Remove the main case unit (11a - 11h).
Figure 4. Remove the Bottom Case and Ink Absorber
Figure 5. Remove the Logic Board Ass'y and PE Sensor Board Ass'y
Figure 6. Remove the Sheet Feed Unit
Figure 7. Remove the Carriage Unit and Pressure Roller Unit
Figure 8. Remove the Platen Unit and Spur Unit
Figure 9. Remove the Purge Drive System Unit and Switch System Unit
A complete discussion regarding Canon iP4600 series repairs, please read Troubleshooting Canon iP4600 series (7 chapters). If you have trouble doing it yourself, we recommend asking for the help of the nearest Canon Service Center or printer repair professional.





Post a Comment for "How to disassemble Canon iP4600, iP4630, iP4640, iP4650, iP4660, iP4670, iP4680"