How to Reset Canon iP4800 series if Logic Board is replaced
Information below for Canon iP4800 series: Canon iP4800, iP4810, iP4820, iP4840, iP4850, iP4870, iP4880. For a complete discussion (7 chapters) regarding repairs to the Canon iP4800 series, please read Troubleshooting Canon iP4800 series.
When there is damage to the printer and in the end it is decided to replace the Logic Board then before the Logic Board is replaced you must print the EEPROM data from the old Logic Board. Information regarding error codes on Canon iP4800 series which may require Logic Board replacement, please read Service Call Error and Solution on Canon iP4800 series. To print the EEPROM data use the Service Tool portable software (support OS Windows.) After the EEPROM data from the old Logic Board has been printed, the Logic Board replacement can be performed.
After the installation of the new Logic Board is complete, print the EEPROM data from the new Logic Board then compare it with the EEPROM data from the old Logic Board. There are some EEPROM data that must be changed on the new Logic Board. The following is an example of how to change the EEPROM data.
How to reset Canon iP4800 series if Logic Board is replaced
1. Enter Service Mode
2. Print EEPROM data from Old Logic Board
3. Remove the Old Logic Board and replace it with a new one
4. Enter Service Mode
5. Print EEPROM data from New Logic Board
6. Reset EEPROM data from New Logic Board
1. Enter Service Mode
- The printer is in an error condition and the Old Logic Board is still installed in the printer.
- USB and Power cables are still connected to the printer.
- The printer is off.
Enter Service Mode
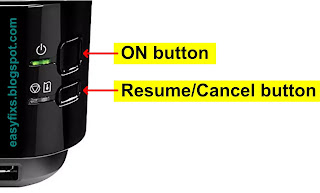
1. Press and hold the Resume/Cancel button.
2. Press and hold the Power button.
3. Release the Resume/Cancel button while the Power button is still being held.
4. While holding down the Power button, press the Resume/Cancel button 5 times *1.
5. When finished pressing the Resume/Cancel button 5 times, release the Power button.
6. Wait for a while, the Power LED will flash and finally turn green and not flash. If the Power LED is green it means the printer is ready for Service Mode Operation.
*1 . To enter Service Mode, press the Resume/Cancel button 5 times. However, if the above procedure has been carried out correctly, and the printer fails to enter Service Mode (Power LED keeps flashing, or Alarm LED flashes orange), repeat the above procedure, and in step No.4, press the Resume/Cancel button 6 times ( enter Service Mode without scanner)
2. Print EEPROM data from Old Logic Board
1. Download Service Tool v.1074
2. Extract the rar file then open Service Tool v.1074
3. Load A4/Letter paper (1 sheet or more) in the rear tray.
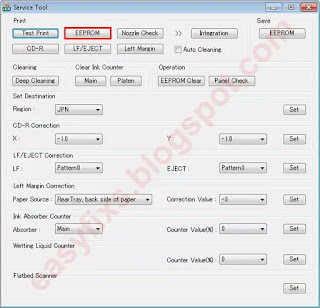
4. Press the EEPROM button to print the EEPROM data. Wait a few moments for the EEPROM data to finish printing.
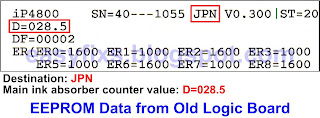
Note
Destinations: JPN (Japan)
Main Ink Absorber Counter Value: D=028.5
5. After the EEPROM data has finished printing, close the Service Tool and turn off the printer. The next process is to replace the Old Logic Board with a new one.
3. Remove the Old Logic Board and replace it with a new one
- Make sure you have purchased a New Logic Board before disassembling the printer.
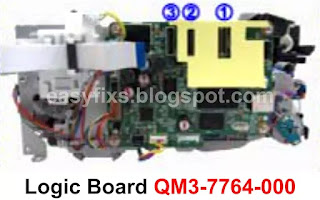
- New Logic Board for Canon iP4800 series can be purchased at the online store with Part Number QM3-7764-000
- Information related to how to disassemble the printer you can read in the following post How to disassemble Canon iP4800 series.
- After the Logic Board is replaced, then reset the EEPROM data.
4. Enter Service Mode
After the installation of the New Logic Board is complete, we will then reset the EEPROM data of the New Logic Board. Please follow the procedure below.
- The printer can be reset if it is in Service Mode state.
- The USB and Power cables are still connected to the printer and the printer is turned off.
Enter Service Mode
1. Press and hold the Resume/Cancel button.
2. Press and hold the Power button.
3. Release the Resume/Cancel button while the Power button is still being held.
4. While holding down the Power button, press the Resume/Cancel button 5 times *1.
5. When finished pressing the Resume/Cancel button 5 times, release the Power button.
6. Wait for a while, the Power LED will flash and finally turn green and not flash. If the Power LED is green it means the printer is ready for Service Mode Operation.
*1 . To enter Service Mode, press the Resume/Cancel button 5 times. However, if the above procedure has been carried out correctly, and the printer fails to enter Service Mode (Power LED keeps flashing, or Alarm LED flashes orange), repeat the above procedure, and in step No.4, press the Resume/Cancel button 6 times ( enter Service Mode without scanner)
5. Print EEPROM data from New Logic Board
- Open Service Tool v.1074
- Load A4/Letter paper (2 sheet or more) in the rear tray.
- Press the EEPROM button to print the EEPROM data.
Note
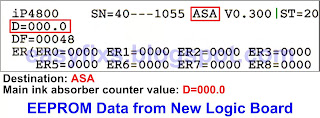
Destinations: ASA (Asia)
Main Ink Absorber Counter Value: D=000.0
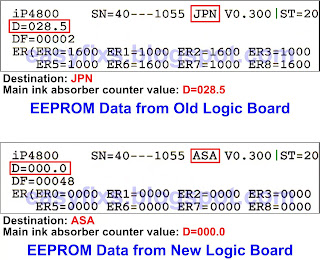
- Compare EEPROM data of Old and New Logic Boards.
Old Logic Board
- Main Ink Absorber Counter Value: D=028.5
New Logic Board- Destination: ASA (Asia)
- Main Ink Absorber Counter Value: D=000.0
Note
- Destinations. Canon iP4800 series printers purchased in Japan automatically destination is JPN (Japan), while the new Logic Board purchased comes from ASA (Asia). So the EEPROM data for the Destination Country should be changed from ASA to JPN.
- Ink Absorber Counter. Because the value of the Ink Absorber Counter before the Logic Board was replaced was D=028.5 then when a New Logic Board is installed, the Ink Absorber Counter will read D=000.0. In order to avoid an error in the Ink Absorber Calculation, the value of D=000.0 must be reset to D=030.0 (30%)
- For other EEPROM data such as the number of pages that have been printed/copied, etc., it cannot be reset because the Service Tool only provides a limited menu for resetting the EEPROM data.
6. Reset EEPROM data from New Logic Board
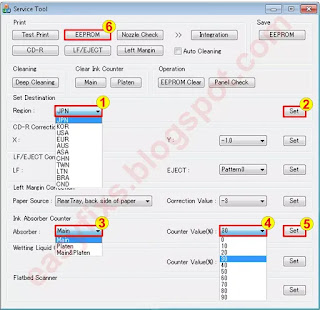
- Set Destination, Region: JPN (1) then press Set (2). When the Set button is pressed, the Power LED will flash as a sign that the EEPROM has been reset.
- Ink Absorber Counter, Absorber: Main (3)
- Counter Value(%): 30% (4) then press Set (5). When the Set button is pressed, the Power LED will flash as a sign that the EEPROM has been reset.
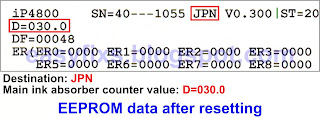
- Press the EEPROM (6) to print the EEPROM data after reset. Notice if the Destination and Ink Absorber Counter values have changed. Look at the picture below, the EEPROM data changes after resetting.
- If the EEPROM data has been successfully reset, close the Service Tool then turn off the printer by pressing the Power button.
- Wait a few moments, then turn on the printer again. Done.
A complete discussion regarding Canon iP4800 series repairs, please read Troubleshooting Canon iP4800 series (7 chapters). If you have trouble doing it yourself, we recommend asking for the help of the nearest Canon Service Center or printer repair professional.
Post a Comment for "How to Reset Canon iP4800 series if Logic Board is replaced"