Reset Canon Printers Manually
When should the printer be reset?
The Canon printer must be reset if:
- Replace the waste ink absorber. Inside the printer there are spare parts that function to absorb waste ink. If the waste ink absorber is full, the computer's LCD screen will display the error message "Waste ink absorber is full, with error code 1700 or 5B00". The solution to this problem is to replace the waste ink absorber and reset the waste ink counter.
- Replace the logic board. Inside the printer there are spare parts, namely the logic board. If there is damage to the printer and eventually the logic board is replaced, after the new logic board is installed, the printer must be reset. Error codes requiring logic board replacement, please see Service Call Error.

How do I reset the printer?
There are two ways to reset the printer, namely:
- Reset manually. Resetting the printer manually is done by pressing the ON/Power and Stop/Reset/Resume buttons a certain number of times, alternately.
- Reset with Service Tool software. Service Tool is a portable software that works on the Windows Operating System and the printer is connected to the computer with a USB cable. Make sure the printer driver has been installed on the computer before using this tool. The Service Tool cannot be used if the printer is connected to a computer with wireless, or if the printer driver has not been installed on the computer.
What printers can be reset using the Manual and Service Tool?
List of printers that are reset manually
List of printers that are reset with Service Tool
- Canon Pixma iP Series: iP100, iP2000, iP3000, iP3300, iP4000, iP4000R, iP4200, iP4300, iP4500, iP5000, iP5200, iP5200R, iP5300, iP6000D, iP6210D, iP620D, iP620D, iP620D, iP620D, iP620D
- Canon Pixma MX Series: MX300, MX308, MX310, MX318, MX700, MX850, MX7600
- Canon Pixma MP Series: MP140, MP145, MP150, MP160, MP170, MP180, MP450, MP460, MP500, MP510, MP520, MP530, MP600, MP600R, MP610, MP800, MP800R, MP810, MP830, MP950, MP960, MP970
- Canon Pixma iX Series: iX4000, iX5000
- Canon Pixma Pro Series: Pro9000, Pro9500
- Canon Pixus iP Series: iP3100, iP4100, iP4100R, iP4200, iP4300, iP4500, iP5200R, iP6100D, iP8600
- Canon Pixus MP Series: MP170, MP450
- Canon Bubble Jet i Series: i70, i80
- Canon Pixma iP Series: iP90, iP90V
- Canon Pixus Series: 50i, 80i, iP90
- If your printer is not in the list above, resetting the printer is done using the Service Tool.

How to reset the printer manually
1. Enter Service Mode
2. Reset the printer
1. Enter Service Mode
Please pay attention to the Power/Start/ON/OFF button and the Stop/Reset/Resume/Cancel button.


Service Mode Operation Procedure
1. Connect the printer's USB cable to the PC/Laptop, and the printer is off.
2. Press and hold the Stop/Reset/Resume/Cancel button (DO NOT release the button), then
3. Press and hold the Power/Start/ON/OFF button (DO NOT release the button), then
4. Release the Stop/Reset/Resume/Cancel button (Power/Start/ON/OFF button still pressed), then
5. Press the Stop/Reset/Resume/Cancel button x times and then release Power/Start/ON/OFF button.
6. Wait a few moments, the Power LED will blink and finally turn green (glow green and not blinking). If the Power LED is green and not blinking it means the printer has entered Service Mode. If the Power LED continues to blink, turn off the printer, repeat the above procedure correctly.
x times
Press Stop/Reset/Resume/Cancel button 2 or 3 times. Here is the difference between 2 or 3 times.
2 times. Manually reset on:
- Canon Pixma iP Series: iP100, iP2000, iP3000, iP3300, iP4000, iP4000R, iP4200, iP4300, iP4500, iP5000, iP5200, iP5200R, iP5300, iP6000D, iP6210D, iP6220D, iP6600D, iP8500.
- Canon Pixma MX Series: MX300, MX308, MX310, MX318, MX700, MX850, MX7600
- Canon Pixma MP Series: MP140, MP145, MP150, MP160, MP170, MP180, MP450, MP460, MP500, MP510, MP520, MP530, MP600, MP600R, MP610, MP800, MP800R, MP810, MP830, MP950, MP960, MP970
- Canon Pixma iX Series: iX4000, iX5000
- Canon Pixma Pro Series: Pro9000, Pro9500
- Canon Pixus iP Series: iP3100, iP4100, iP4100R, iP4200, iP4300, iP4500, iP5200R, iP6100D, iP8600
- Canon Pixus MP Series: MP170, MP450
3 times. Manually reset on:
- Canon Bubble Jet i Series: i70, i80
- Canon Pixma iP Series: iP90, iP90V
- Canon Pixus Series: 50i, 80i, iP90
2. Reset the printer
Canon printers have two waste ink absorbers namely Main waste ink absorber, and Platen waste ink absorber. However, not all printers have two waste ink absorbers. Sometimes a printer only has one waste ink absorber, which is the Main waste ink absorber. From the list of printers above, we will group them into two, namely printers that only have Main waste ink absorber, and printers that have Main and Platen waste ink absorber.
Printers that only have Main waste ink absorber (please read Method No.1)
- Canon Bubble Jet i Series: i70, i80 (3 times)
- Canon Pixma iP Series: iP100, iP3000, iP4000, iP4000R, iP4200, iP4300, iP4500, iP5000, iP5200, iP5200R, iP5300, iP6000D, iP6600D, iP8500 (2 times)
- Canon Pixma MX Series: MX850 (2 times)
- Canon Pixma MP Series: MP170, MP450, MP530, MP600, MP600R, MP610, MP810, MP830, MP950, MP960, MP970 (2 times)
- Canon Pixma iX Series: iX4000, iX5000 (2 times)
- Canon Pixus Series: 50i, 80i (3 times)
- Canon Pixus iP Series: iP3100, iP4100, iP4100R, iP4200, iP4300, iP4500, iP5200R, iP6100D, iP8600, (2 times)
- Canon Pixus MP Series: MP170, MP450 (2 times)
Printers that have Main and Platen waste ink absorber (please read Method No.2)
- Canon Pixma iP Series: iP90, iP90V (3 times)
- Canon Pixma iP Series: iP2000, iP3300, iP6210D, iP6220D (2 times)
- Canon Pixma MX Series: MX300, MX308, MX310, MX318, MX700, MX7600 (2 times)
- Canon Pixma MP Series: MP140, MP145, MP150, MP160, MP180, MP460, MP500, MP510, MP520, MP800, MP800R (2 times)
- Canon Pixma Pro Series: Pro9000, Pro9500 (2 times)
- Canon Pixus Series: iP90 (3 times)
Method No. 1 (printers that only have Main waste ink absorber)
After the printer enters Service Mode, please follow the procedure below.
Press the Stop/Reset/Resume/Cancel button according to the table below, then press the Power/Start/ON/OFF button to execute.
Table 1. Menu Selection Mode
| Time(s) | LED | Function |
| 0 times | Green | Power off |
| 1 time | Orange | Service test print |
| 2 times | Green | EEPROM information print |
| 3 times | Orange | EEPROM initialization |
| 4 times | Green | Waste ink counter resetting |
| 5 times | Orange | Enter the destination settings mode |
| 6 times | Green | Print head deep cleaning |
6). Insert paper (A4 or Letter), then press the Stop/Reset/Resume/Cancel button 2 times, then press the Power/Start/ON/OFF button to execute. Wait for the printer to print "EEPROM information print" before resetting. After the printer has finished printing, the printer will return to "Table 1. Menu Selection Mode".
If the D value reads D=100.0 it means that the value for the Main waste ink counter has reached the maximum value. Next we will reset the value of D to zero.
7). To reset the waste ink counter, press the Stop/Reset/Resume/Cancel button 4 times, then press the Power/Start/ON/OFF button to execute. When this operation is carried out, the LED will blink once, as a reset has been done. After a successful reset, the printer will return to "Table 1. Menu Selection Mode".
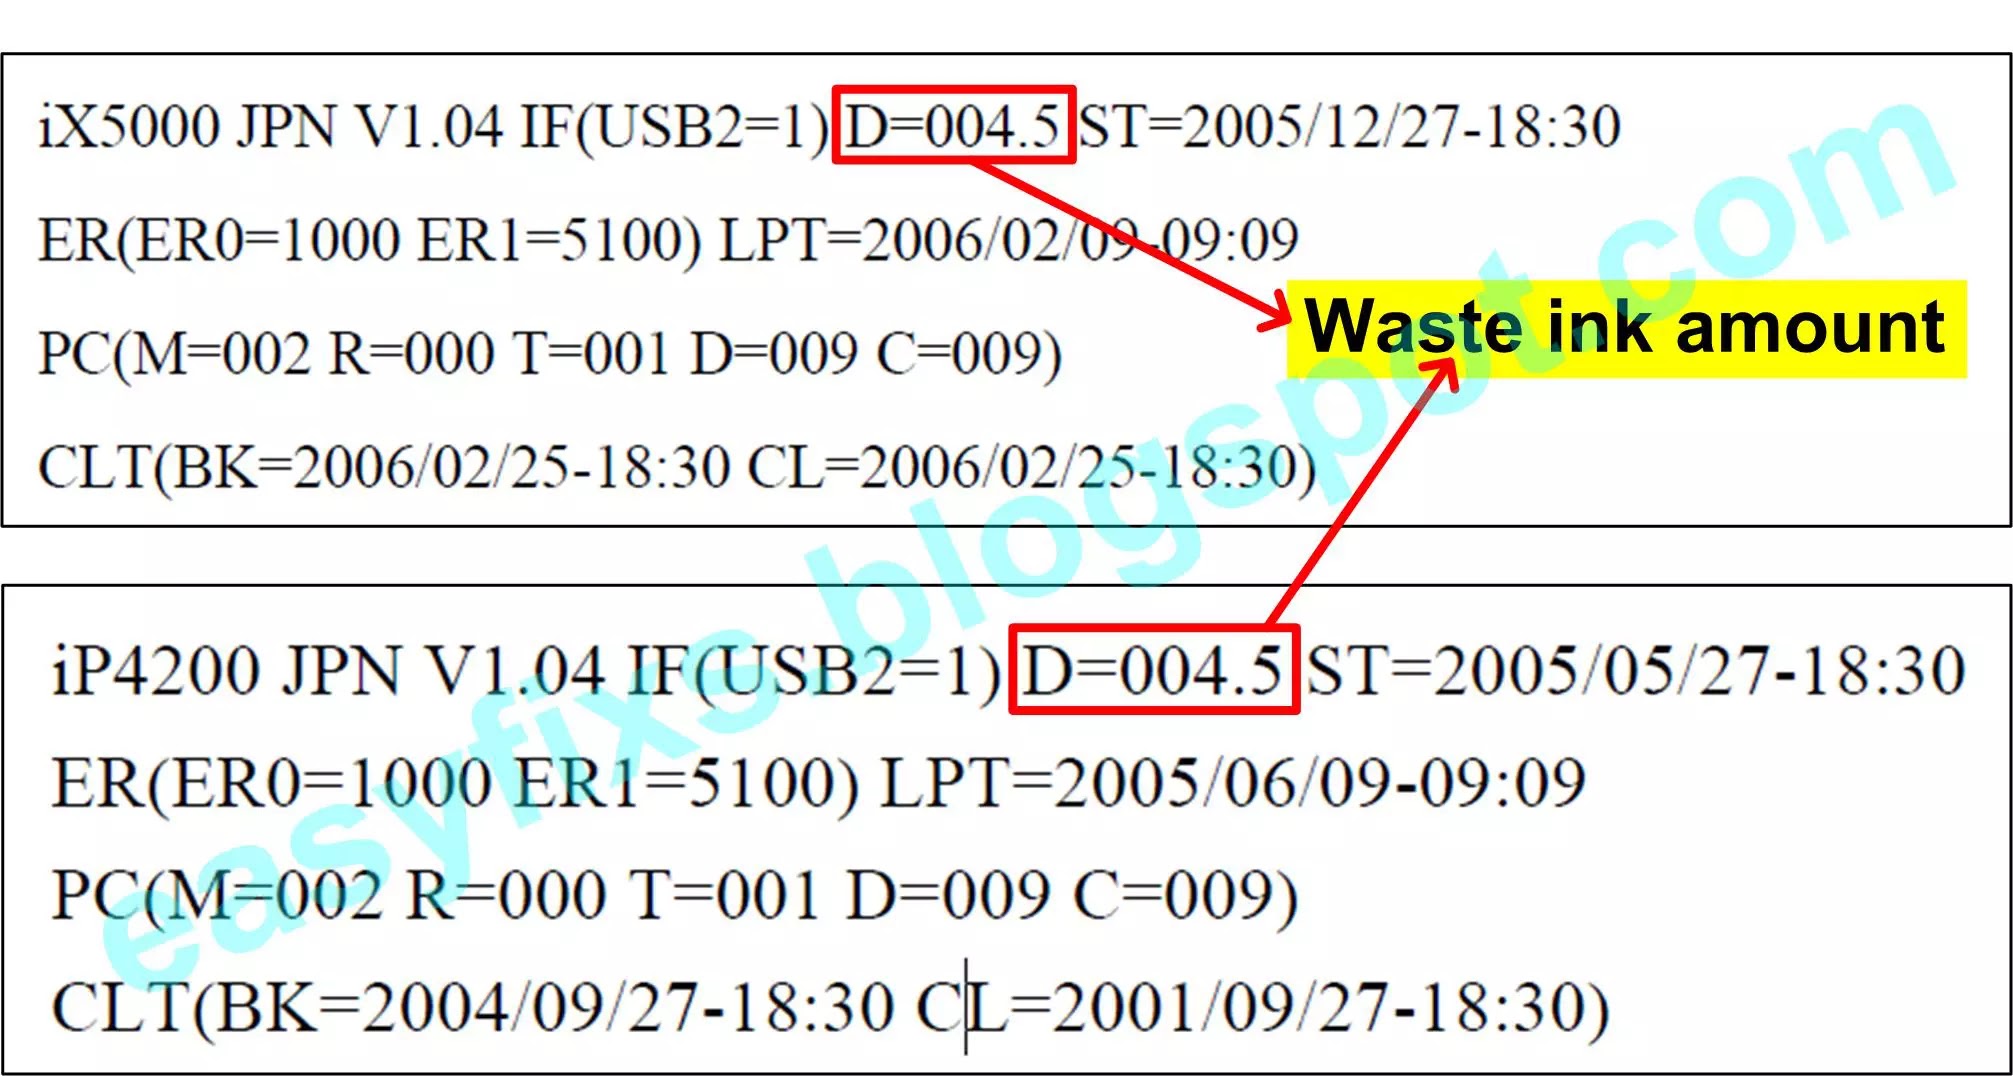
8). Insert paper (A4 or Letter), then press the Stop/Reset/Resume/Cancel button 2 times, then press the Power/Start/ON/OFF button to execute. Wait for the printer to print "EEPROM information print" after resetting. Compare "EEPROM information print" before and after reset. See the value of D (Waste ink amount). If after reset D=000.0 means that the reset has been successfully performed. After a successful reset, the printer will return to "Table 1. Menu Selection Mode".
9). Press the Power/Start/ON/OFF button to turn off the printer, wait 15 seconds then turn ON the printer. Done.
Method No. 2 (printers that have Main and Platen waste ink absorber)
After the printer enters Service Mode, please follow the procedure below.
Press the Stop/Reset/Resume/Cancel button according to the table below, then press the Power/Start/ON/OFF button to execute.
Tabel 1. Menu Selection Mode
| Time(s) | LED | Function |
| 0 times | Green | Power off |
| 1 time | Orange | Service test print |
| 2 times | Green | EEPROM information print |
| 3 times | Orange | EEPROM initialization |
| 4 times | Green | Enter the waste ink counter resetting mode |
| 5 times | Orange | Enter the destination settings mode |
| 6 times | Green | Print head deep cleaning |
6). Insert paper (A4 or Letter), then press the Stop/Reset/Resume/Cancel button 2 times, then press the Power/Start/ON/OFF button to execute. Wait for the printer to print "EEPROM information print" before resetting. After the printer has finished printing, the printer will return to "Table 1. Menu Selection Mode".
7). Press the Stop/Reset/Resume/Cancel button 4 times then press the Power/Start/ON/OFF button to execute (enter the waste ink counter resetting mode, see Table 1.)
After entering the waste ink counter reset mode, follow the Waste ink counter reset procedures. There are 3 types of reset procedures for waste ink counters.
Procedure 1
Follow the procedure below, for the printer:
- Canon Pixma iP Series: iP90, iP90V, iP3300, iP6210D
- Canon Pixma MX Series: MX300, MX308, MX310, MX318, MX700
- Canon Pixma MP Series: MP140, MP145, MP150, MP160, MP180, MP460, MP510, MP520
- Canon Pixus Series: iP90
Table 2a. Waste ink counter reset procedures
| Time(s) | LED | Waste ink counter to be reset |
| 0 times | Green | Reset the main waste ink counter (0%) |
| 1 time | Orange | Reset the platen waste ink counter (0%) |
| 2 times | Green | Reset both the main and platen ink counter (0%) |

Note
- D = Main waste ink counter
- Ps = Platen ink waste counter
- If the value is D=100.0 and Ps=001.0 then please reset the Main waste ink counter, while the Platen waste ink counter does not need to be reset.
8). To reset the Main waste ink counter (0%), no need to press the Stop/Reset/Resume/Cancel button just press the Power/Start/ON/OFF button 1 time (see table 2a). After a successful reset, the printer will return to "Table 1. Menu Selection Mode".
Procedure 2
Follow the procedure below, for the printer:
- Canon Pixma iP Series: iP2000, iP6220D
Table 2b. Waste ink counter reset procedures
| Time(s) | LED | Waste ink counter to be reset |
| 0 times | Green | Reset the main waste ink counter (0%) |
| 1 time | Orange | Reset the platen waste ink counter (0%) |
| 2 times | Green | Reset both the main and platen ink counter (50%) |

Note
- D = Main waste ink counter
- PD/Ds = Platen ink waste counter
- If the value is D=100.0 and PD/Ds=000.2 then please reset the Main waste ink counter, while the Platen waste ink counter does not need to be reset.
8). To reset the Main waste ink counter (0%), no need to press the Stop/Reset/Resume/Cancel button just press the Power/Start/ON/OFF button 1 time (see table 2b). After a successful reset, the printer will return to "Table 1. Menu Selection Mode".
Procedure 3
Follow the procedure below, for the printer:
- Canon Pixma MX series: MX7600
- Canon Pixma MP series: MP500, MP800, MP800R
- Canon Pixma Pro series: Pro9000, Pro9500
Table 2c. Waste ink counter reset procedures
| Time(s) | Waste ink counter reset procedures | Remarks |
| 0 times | Reset the main waste ink counter (0%) | |
| 1 time | Reset the platen waste ink counter (0%) | Not valid for the MX7600, MP500, MP800, MP800R, Pro9000, Pro9500 |
| 2 times | Reset both the main and platen waste ink counter (0%) | Only the main waste ink absorber is valid for the MX7600, MP500, MP800, MP800R, Pro9000, Pro9500 |

Note
If the D value reads D=100.0 it means that the value for the Main waste ink counter has reached the maximum value. Next we will reset the value of D to zero.
8). To reset the Main waste ink counter (0%), no need to press the Stop/Reset/Resume/Cancel button, just press the Power/Start/ON/OFF button 1 time (see table 2c). When this operation is carried out, the LED will blink once, as a reset has been done. After a successful reset, the printer will return to "Table 1. Menu Selection Mode".
Note: So to reset waste ink counter, there are 3 different procedures. Use the procedure that corresponds to the printer that was repaired. For step 9) and so on, all printers are the same. So, the difference occurs in step 8) that is when doing a waste ink counter reset.
9). Insert paper (A4 or Letter), then press the Stop/Reset/Resume/Cancel button 2 times (see table 1), then press the Power/Start/ON/OFF button to execute. Wait for the printer to print "EEPROM information print" after resetting. Compare "EEPROM information print" before and after reset. See the value of D (Waste ink amount). If after reset D=000.0 means that the reset has been successfully performed. After a successful reset, the printer will return to "Table 1. Menu Selection Mode".

11). Press the Power/Start/ON/OFF button to turn off the printer, wait 15 seconds then turn ON the printer. Done.
Questions and Answers
Q: The printer printout is bad, is the print head clogged/damaged, should I replace the cartridge?
A: A complete discussion regarding this issue, please read Troubleshooting Canon printer poor printouts
Q: Where can I get other Canon Service Tools?
A: For complete information regarding Canon Service Tool collection, please open Canon Service Tool Version
Q: I don't know which Service Tool supports my printer, where can I get information about it?
A: For complete information regarding Canon printers and the Service Tools used, please open the Canon Service Tools and Supported Printers
Q: Error code: 002, 005, 006, 007, 009 when using the Service Tool. What should I do?
A: Discussion and solutions to this problem, please read the following post Canon Service Tool Error Code Mean (Error code: 002, 005, 006, 007, 009, etc)
A: Discussion and solutions to this problem, please read the following post Canon Service Tool Error Code Mean (Error code: 002, 005, 006, 007, 009, etc)
Waste ink counter resets can be done in two ways, manually and by Service Tool. For resets that are done manually, divided into two methods (Method #1 and Method #2). For printers that use Method #2, in step 8) they are divided into 3 procedures. This post was written referring to Canon's Printer Service Manual document.
Hi!
ReplyDeleteFor a Canon PIXMA TS6050 printer, what combination can be used to reset the waste ink counter and print EEPROM informations? I didn't succeed with Canon service tool v5103 program.
Thank you for your help!
Try using the service tool v.4906
DeleteWhere can I download this version for free? Please send me a Google drive download link. Can you send v5.306? Thank you for your help and response!
DeleteHi,
ReplyDeleteIf Pixma G22000, orange blinking 7 times, what does it mean?
Please can you tell me which instructions to use for a Pixma G3500?
ReplyDeleteYour detailed instructions are doing us all a great service.
Hi,
ReplyDeleteI have a Canon iP8500 and I have a problem: it's impossible to enter in "service mode", I try 10 times but nothing... I don't know why... How can I resolve that?
I CAN'T FIND MY PRINTER HERE, IT IS CANON PIXMA MG3070S
ReplyDeletenot for MG3070S
Deletehow about canon MP237?
ReplyDeletewith canon mg2500 and mg2570s?
ReplyDeletehi,
ReplyDeleteI'm working around the Pixma MG2550S. This one is an AIO printers with scanner so (as written here) to enter in "Service Mode" should be doing keeping pressed Resume then ON/OFF button and next release Resume and press it 6 times and next release both buttons but in this way ON led is green but printer is offline and nothing happen if I press again Resume no matter how much times.
Finally I found that this model need 4 times Resume pushes to Enter into Service Mode. I think its right because if next to it I run Service Tool buttons are working and not grayed, but everything I try to push on program I get back error 06. Right now I tried Service Tool v1050, v1074 and v3400.
When I put printer on Service Mode if I press again Resume button just green ON LED stay on and if I try to push 2 or 4 times and next I press ON/OFF button ON Led blinks and next printer shut off and its impossible to power ON again if I dont' disconnect the power cord. When I plug in it again the printer start but it give me again the INK Waste absorber error.
Hi.
DeleteReset can be done in two ways: reset manually (as in this post), and reset with the Service Tool. Reset manually, not for Canon MG2550s. For Canon MG2550s, reset is done with the Service Tool.
You have tried Service Tool v1050, v1074 and v3400, and you see error code 006 (006 means the Service Tool does not support the printer). In the Service Manual document for Canon MG2400 series and MG2500 series (QY8-2349-000), there is no mention of Service Tool that supports Canon MG2500 series.
In my opinion, a suitable Service Tool for the MG2550s is likely the ST.3900. Unfortunately there is no ST.3900 on the internet. Then if the Service Tool is newer, it can reset the MG2550s. Until now, I can't confirm that.
In this blog, I am sharing a Service Tool that you might try ST.4906. The link for ST.4906 is in a post entitled "Canon Pixma iP110 error code [5B00, 5B01]. How to fix it".
To enter Service Mode, press the STOP button 5 times. If pressing the STOP button 5 times fails, repeat the procedure, and press the STOP button 6 times.
If ST.4906 is not suitable for MG2550s, another alternative solution is to replace the printer's EEPROM IC.
Thanks for your reply. I know its really strange but if I try:
Delete5 times orange LED is ON and printer is offline
6 times green LED blinks and next start again the error pattern
4 times green LED blinks, carriage move, green LED stay solid ON and printer is online. In this way Service Tool is working even if it give me code006 error.
I think it may possibile that this printer has a 2 + 1 stop pressing to enter Service Mode.
Now I'll try your suggestion and I'll let you know if it works.
Update: I tried ST.4906 and I can be sure that Canon Pixma MG2550S enter in Service Mode so on step 5:
ReplyDeletePress and release the Stop/Reset/Resume/Cancel button 3 times, then press and hold the Stop/Reset/Resume/Cancel button 1 time, then release both buttons simultaneously (Stop/Reset/Resume/Cancel and Power/Start/ON/OFF).
If next to it I start Service Tool 4906 on bar menu I can read:
Device / SN AEPK... that its exactly the serial number of the printer!
Trying different buttons it give me always error 006 but if I press Error Status it looks it wait a few seconds before to give me the error.
It seems that ST.4906 doesn't support MG2550S.
DeleteAbout the Service Tool (the information below is only my personal opinion)
- Every time a new printer series is released, Canon will release a new Service Tool.
- Each Service Tool supports several types of printers.
- The Service Tool is the same as other applications in that there are updates for each version.
- To find the compatibility of a printer with the Service Tool, one way is to know the year the printer was released, and the year the Service Tool was released.
Canon MG2550S was released in July 2016 (if I'm not mistaken). So use the Service Tool released in 2016. Here are the Service Tools released in early 2015, to early 2017.
Canon Service Tool v.4620 = February 2015
Canon Service Tool v.4718 = July 2015
Canon Service Tool v.4720 = February 2016 (last release version 4700)
Canon Service Tool v.4904 = June 2016
Canon Service Tool v.4905 = September 2016
Canon Service Tool v.4906 = September 2016
Canon Service Tool v.4907 = February 2017 (latest release version 4900)
In my opinion, MG2550S was released around July 2016, the one that supports MG2550S is Service Tool v.4900 series or later. For ST.3900 not for MG2550S but for Canon MG2550 (released in 2013). Hopefully useful.
Hi, i need to know how to fix error b200 in canon pixma ip 8750. Can you help me???
ReplyDeleteHi,
DeleteError code: B200
Cycles of blinking of Alarm and Power LEDs: 10 times
Error: VH monitor error
Conditions: The print head voltage is abnormal
Check points & Solution:
(1) Print head condition (face surface and mold):
If a burn mark or heat deformation is seen on the face surface or the mold, replace the print head and the logic board in set. (Be sure to replace them at the same time.)
(2) Burn mark or heat deformation of the logic board:
If a burn mark or heat deformation is seen on the logic board, replace the print head and the logic board in set. (Be sure to replace them at the sametime.)
(3) Head contact pin condition of the carriage unit:
If the pin is bent or deformed, replace the carriage unit.
(4) Cable connection:
Re-connect the cable. If any damage or breakage of the cable is found, replace the carriage unit.
Parts to be replaced (when no solution is effective)
- AC adapter
- Carriage unit
Hi, on the PRO9000 I have a problem with print head (five orange LED lights - error 1403). How I can reset the print head (printer)?
ReplyDeleteThank you
How to reset Canon Pro9000
DeleteEnter Service Mode
1. Press and hold the Resume/Cancel button
2. Press and hold the Power button
3. While holding the Power button, release the Resume/Cancel button. (DO NOT release the Power button.)
4. While holding the Power button, press the Resume/Cancel button 2 times, and then release the Power button. If the Power LED turns green, it means that the printer has entered Service Mode.
Note:
- If the LED does not light in green (the printer does not enter the service mode), disconnect the power cord and plug it again. Then start from step 1) to start the printer in the service mode again.
- If the automatic power-on function is enabled in the printer, the printer enters the service mode for the first time, but it will never enter the service mode if the printer is turned off by the Power button. This is because the printer remains to be turned on internally if the power is turned off by the Power button. To prevent this, disconnection of the power cord is required before starting the printer in the service mode.
Entering the counter resetting mode
5. Press Resume/Cancel 4 times then press Power 1 time.
Ink absorber counter resetting
6. Press the Resume/Cancel button 2 times, then the Power button. The counters will be reset.
Entering the destination settings mode
7. Press Resume/Cancel 5 times then press Power 1 time.
Destination settings
After entering the destination settings mode, press the Resume/Cancel button the specified number of time(s) to select the destination. To destination: Japan (1 time), Korea (2 times), US (3 times), Europe (4 times), Australia (5 times), Asia (6 times), China (7 times), Taiwan (8 times) .
8. Example: For US destination countries. Press the Resume/Cancel button 3 times then press the Power button.
EEPROM initialization
9. Press Resume/Cancel 3 times then press Power 1 time.
EEPROM information print
10. Load paper (A4 or Letter)
11. Press Resume/Cancel 2 times then press Power 1 time. Wait a few moments, the printer will print the EEPROM information.
12. Press the Power button 1 time to turn off the printer. Wait about 15 seconds, then turn the printer back on. Done.
hello, were you able to figure out how to do this? i am having the same issue. i see in the post that it says you can "Reset" the printer, but i do not see anything about resetting it after a hardware change. i am not sure what to do.
DeleteOn the front of the Canon Pro9000 there are two buttons, namely the Power button and the Resume / Cancel button (below the Power button).
DeleteHere's how to reset the Canon Pro9000
Power cable is connected to a power source, and the printer is turned off.
1. Press and hold the Resume / Cancel button (keep pressing the Resume / Cancel button and don't release it), then
2. Press and hold the Power button (keep pressing the Power button and don't release it). Now both buttons are still pressed.
If the Power LED turns green it means that procedures 1 and 2 have been performed correctly.
3. Just release the Resume / Cancel button, while the Power button is still being held.
4. While holding down the Power button, press the Resume / Cancel button 2 times, and then release the Power button.
Wait a few moments, the Power LED will flash and finally turn green. If the Power LED is green and not blinking, it means that procedures 3 and 4 have been performed correctly.
5. Press the Resume / Cancel button 4 times.
When you press the Resume / Cancel button 4 times, the Power and Alarm LEDs will light up alternately, namely:
Orange - Green - Orange - Green
1 time - 2 times - 3 times - 4 times
So, after you press the Resume / Cancel button 4 times, the Power LED will turn green.
6. After doing step No.5 above, wait for about 5-10 seconds then do the next step.
7. Press the Resume / Cancel button 2 times, then press the Power button 1 time. This procedure means that the waste ink counter value is reset to zero.
Note: When the Power button is pressed 1 time, the Power LED will flash. This means that the reset was successful.
8. Press the Power button 1 time to turn off the printer, wait about 15 seconds, then turn the printer back on. Done.
After procedure 3 & 4, the green and amber lights alternately blink 10 times and just keep blinking that pattern. I tried unplugging the printer and USB cables for a couple minutes and then re-trying this method described above to no avail. Any other suggestions are SURELY welcome.
DeleteWhere can I find the tool which I can run on MAC OS to download?
ReplyDeleteI CAN'T FIND MY PRINTER HERE, IT IS CANON PIXMA MG2960
ReplyDeleteRefer to the information in the Canon MG2900 series Service Manual, to reset Canon MG2960 use Service Tool v.4502
DeleteI appreciate your help, but I am also stuck trying to reset my Pixma Pro 9000 after changing the print head. I follow the procedure you outlined above in the comments (May 21, 2021) and while the power light is green, the orange light below it flashes 5 times and then goes out for a longer time, then flashes 5 times, etc. If I try pressing resume 4 times as you suggest the lights do not change. Still green on solid for the power light and the orange light keeps flashing 5 times then off, 5 times then off, etc.
ReplyDeleteSo I don't know if this new head is defective or if I just can't figure how to do this reset properly. Any ideas?
How to reset the canon mp990?
ReplyDeleteHow to reset my canon mp990 manually
ReplyDeleteFollowed your instructions and all worked. Thanks,
ReplyDeleteI didn't get the canon pixma TR4540 model, Would pl. help me how to reset support code 1704 on this model?
ReplyDeleteHello .. can u help me.... i need to reset may waste ink pad counter... MG3070s model thank youuu!!!
ReplyDeletei have a canon pixma ip1800 printer but i can fix the problem with inkt
ReplyDelete