A printer's ink pad is at the end of its service life at the Epson L120
Every time the printer is turned on and will start printing, the pump will suck ink from the print head to make sure the printer is ready to be used for printing. This process produces waste ink that is drained and collected in the waste ink pad. Until one day, this waste ink pad is full and reaches its maximum capacity.
When the waste ink pad is full, the Power button light turns yellow, and the Resume button light turns orange, alternating. When checking printer status: A printer's ink pad is at the end of its service life. Please contact Epson Support.
Problem Description
Problem
- When the printer is turned on, the Power and Resume lights flash alternately.
- Printer status: A printer's ink pad is at the end of its service life. Please contact Epson Support.
Error
- A printer's ink pad is at the end of its service life.
Solution
When the printer is turned on, and the Power and Resume button lights alternate yellow - orange and the printer cannot be used. Repair is carried out in two stages:
1. Replace the ink pad
1b. Clean the ink pad
1c. Modify the waste ink reservoir
2. Reset the waste ink pad counter
1. Replace the ink pad
There are 3 alternative solutions that can be done, choose the one that suits you best.
There are 3 alternative solutions that can be done, choose the one that suits you best.
1a. Replacing the ink pad with a new one
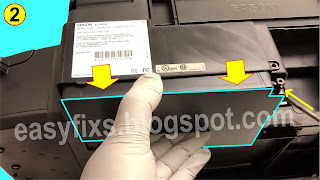
- Open the screw behind the printer.
- To remove the ink pad, slide it sideways then pull down on the ink pad.
Note:
New ink pads for Epson L120 can be purchased in online stores with the keyword "Ink pad Epson L120"
1.b. Clean the ink pad
1.b. Clean the ink pad
- If you're having trouble getting a new ink pad, an alternative solution is to clean the old ink pad, dry it, and then reinstall it.
- Soak it repeatedly, until you feel the ink pad is clean. After soaking, dry the ink pad, make sure the ink pad is completely dry before putting it back into the printer.
1.c. Modify the waste ink reservoir
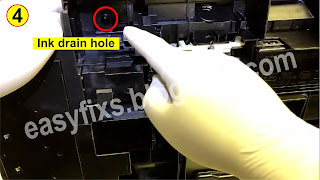
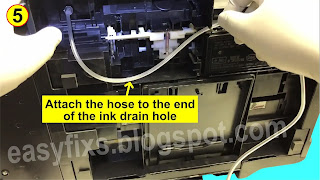
Modifications are made by installing a hose at the end of the drain pipe so that the waste ink can flow into a transparent plastic bottle placed outside the printer.
Prepared Ingredients:
- Hose with a length of 40-50 cm
- Transparent plastic bottle
- Open the screw behind the printer.
- Remove the ink pad
- Look inside then insert the hose (approx. 40-50 cm). Attach the end of the hose to the waste ink output.
- Reinstall the ink pad box and place a transparent plastic bottle at the end of the hose as a container for waste ink.
When the waste ink reservoir is full, there are three alternative solutions that can be done; replacing the ink pad with a new one or clean the ink pad or modify the waste ink reservoir. Choose a solution that suits your condition. After the problem with the ink pad has been fixed, the next step is to reset the waste ink pad counter with the Epson Adjustment Program.
2. Reset the waste ink pad counter
- Turn on the printer and connect the USB cable
- Download Adjustment Program Epson L120
- Extract file
- Open Adjprog.exe
- If Adjprog can’t be open, right-click Adjprog - Properties - Compatibility - checkbox: Run this program in compatibility mode: select Windows XP SP2/SP3 - OK.
- Download Adjustment Program Epson L120
- Extract file
- Open Adjprog.exe
- If Adjprog can’t be open, right-click Adjprog - Properties - Compatibility - checkbox: Run this program in compatibility mode: select Windows XP SP2/SP3 - OK.
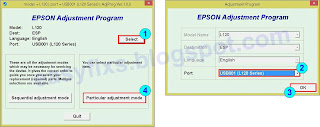
- Open Select (1), Port (2) - select USB port Epson L120 or Auto selection - OK (3), Particular Adjustment Mode (4)
- Waste Ink Pad Counter (5) - OK (6)
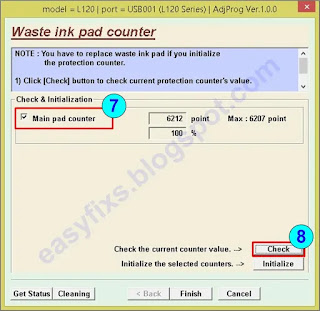
- Checkbox the Main Pad Counter (9), click Initialization (10) - OK (11)
- Please turn off the printer - OK (12), wait for the printer to turn off, then turn the printer back on - OK (13), press the Finish (14) and exit the Epson Adjustment Program. Done
Q: If the ink pad is not replaced or cleaned, and the printer is only reset, will the printer return to normal?
A: Since the waste ink counter has been reset, the printer will return to normal. However, in the near future there will be a new problem, namely the waste ink container will overflow, because it cannot accommodate the waste ink anymore. To prevent unwanted new problems, repair begins with replacing the ink pad or cleaning the ink pad. After the ink pad has been replaced or cleaned, the next step is to reset the waste ink pad counter.
A: Since the waste ink counter has been reset, the printer will return to normal. However, in the near future there will be a new problem, namely the waste ink container will overflow, because it cannot accommodate the waste ink anymore. To prevent unwanted new problems, repair begins with replacing the ink pad or cleaning the ink pad. After the ink pad has been replaced or cleaned, the next step is to reset the waste ink pad counter.
If you have trouble doing it yourself, we recommend contacting the Epson Service Center or the nearest printer repair professional.








thanks
ReplyDeleteup.
ReplyDeletethanks
Thanks
ReplyDeletei have need Epson L3110 reset software
ReplyDelete