Canon iP4700, iP4720, iP4740, iP4750, iP4760, iP4780: Replace the Ink Absorbent Kit and Reset the Ink Absorber Counter
Information below for Canon iP4700 series: Canon iP4700, iP4720, iP4740, iP4750, iP4760, iP4780. For a complete discussion (7 chapters) regarding repairs to the Canon iP4700 series, please read Troubleshooting Canon iP4700 series.
Operator Call Errors (Alarm LED Lit In Orange)
LED (Blinking in orange): 8 times
Error: Warning: The ink absorber becomes almost full.
Error code: 1700, The ink absorber becomes almost full (Overseas)
Error code: 1701, The ink absorber becomes almost full (Japan)
Solution: Pressing the Resume/Cancel button will exit the error, and enable printing for a while.
Service Call Errors (by Cyclic Blinking of Alarm and Power LEDs)
Cycles of blinking of Alarm and Power LEDs: 7 times
Error: Ink absorber full
Error code: 5B00, Main ink absorber is full (Overseas)
Error code: 5B01, Main ink absorber is full (Japan)
Conditions: The ink absorber is supposed to be full.
When the waste ink container has reached 95% when used for printing, the printer will display an error "Warning: The ink absorber becomes almost full." At this stage, printing can be done by pressing the OK button when an error message appears.
When the waste ink reservoir has reached 100% or more, the printer cannot be used, and an error appears "Ink absorber full, error code [5B00 for overseas] or [5B01 for Japan]. At this stage, the printer must be repaired, because the waste ink reservoir has reached its maximum capacity.
Printer repair is done in 2 stages
Stage 1. Replacement the ink absorber
Stage 2. Reset the ink absorber counter
Stage 1. Replacement the ink absorber
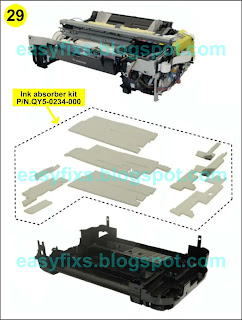
Before replacing an ink absorber, make sure you have purchased a new ink absorber. Ink absorbers for Canon iP4700 series, can be purchased in the market with PN.QY5-0234-000. PN.QY5-0234-000 ink absorber consists of 9 absorbent sheets of different sizes and shapes. See the picture below.
If a new absorber is not available in the market, you can clean the installed ink absorber and use it again. Here's how to clean an ink absorber.
- Soak the ink absorber in a container filled with water. If the water turns cloudy, replace the water with a new one.
- Repeat soaking, until the ink absorbent is clean.
- Once clean, dry the ink absorbent by drying it or airing it out.
- Once dry, pull the ink absorbent to expand. When cleaning, the ink absorbent will deflate. The air cavity in the ink absorber serves to hold the ink. So that the ink absorber expands, pull the ink absorber so that it expands.
- After the ink absorber is dry and inflated, replace it to its original position.
Because the ink absorber is under the printer machine, to replace or clean it, the printer must be disassembled first. Follow the procedure below, how to disassemble Canon iP4700, iP4760, iP4780.
1. Remove the AC adapter, rear guide unit, cover rear guide, and cassette unit.
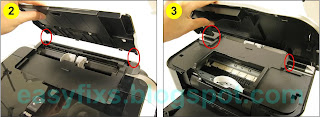
2. Remove the paper support unit and the access cover. While pushing the both sides of the paper support so that the center will warp slightly, release the left and right bosses.
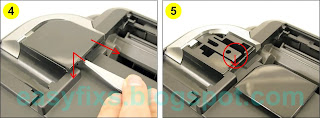
3. Remove the main case covers left and right. While inserting a flat-blade screwdriver, etc. through into a space under the main case cover; and pressing the claw downward, slide the main case cover toward the front side of the printer.
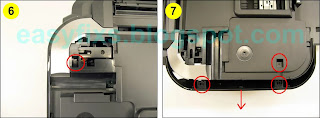
4. Remove the side cover left.
5. Remove the side cover right.
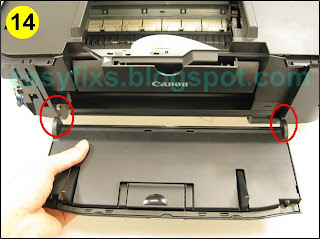
6. Remove the front door unit. While slightly warping the center of the paper output tray downward, release the left and right bosses.
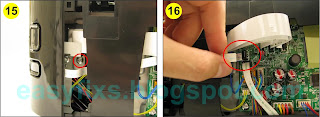
7. Remove the panel cover unit (1 screw).
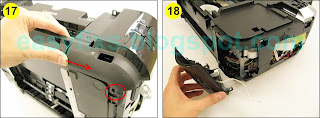
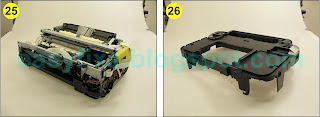
9. Remove the printer engine as a whole, without removing any parts.
10. Replace or clean the ink absorber and make sure that it is installed in its original position.
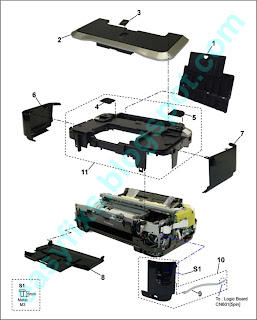
Below is an overview of the printer disassembly process
After the ink absorber has been replaced or cleaned, reassemble the printer and make sure assembly is done properly, to prevent new unwanted damage.
After assembly is complete, the next step is to reset the waste ink counter to zero. To reset Canon iP4700, iP4720, iP4740, iP4750, iP4760, iP4780 use Service Tool v.1050. Follow the next steps on how to reset the waste ink counter to zero.
To reset the printer use the Service Tool v1050. Service Tool v.1050 can be used if the printer is in Service Mode. The following is the procedure for entering Service Mode.
1. Enter Service Mode
Service mode procedures:
- The power and USB cables are connected to the printer, the printer driver has been installed on the computer, and the printer is turned off.
- Press and hold the Resume/Cancel button.
- Press and hold the Power button (don't release both buttons.)
- Release the Resume/Cancel button (don't release the Power button.)
- While holding down the Power button, press the Resume/Cancel button 2 times then release the Power button. Wait a few moments, the Power LED will flash and light green.
Note
- If the Power LED turns green, it means that the printer has entered Service Mode.
- If the Power LED lights orange, it means that the printer failed to enter Service Mode. Turn off the printer by pressing the power button, repeat the procedure to enter Service Mode correctly.
- If the Service Mode entry procedure has been carried out correctly but the printer cannot enter Service Mode, please repeat the procedure above, then press the Resume/Cancel button 3 times (enter Service Mode without a scanner.)
2. Reset the ink absorber counter
- Download Service Tool v.1050
- Extract file and open Service Tool.
- Load paper A4 or Letter (3 sheets or more.)
- Select USB Port (1) printer. Usually, the USB Port will be detected automatically when the Service Tool is opened.
- For your reference in servicing, click EEPROM (2) information print before resetting. Wait a few moments because the printer will print the EEPROM information. Look at the value of D (Main waste ink counter value). If the value of D=100.0 means that the main waste ink counter has reached the maximum. Next we will reset the D value to zero.
- Clear Ink Counter, click MAIN (3). Wait for the printer to finish printing D=000.0. D=000.0 means "The main ink absorber counter has been reset to zero".
- Click EEPROM (2) information print once again after resetting. Compare D values before and after reset. If the value of D=000.0 it means that the waste ink counter has been reset to zero.
- If all goes well, close the Service Tool then turn off the printer, wait about 15 seconds, then turn the printer back on. Done.
Question and Answer
Q: The printer printout is bad, is the print head clogged/damaged, should I replace the cartridge?
A: A complete discussion regarding this issue, please read Troubleshooting Canon printer poor printouts
Q: If the waste ink absorber has been replaced or cleaned but not reset, can the printer be used?
A: The printer cannot be used because the calculation of waste ink is detected to be maximum (100% or more), even though physically the waste ink absorber has been replaced.
Q: If the waste ink absorber has not been replaced or cleaned but only reset, can the printer be used?
A: Because the calculation of waste ink has been reset to zero, even the waste ink absorber has not been replaced or cleaned, the printer will return to normal, however it is very likely that in the future there will be an overflow of waste ink because the ink absorber has saturated and cannot accommodate the waste ink anymore. Resetting the D value to zero becomes effective if the ink absorber has been previously replaced or cleaned.
Q: Error code: 002, 005, 006, 007, 009 when using the Service Tool. What should I do?
A: Discussion and solutions to this problem, please read the following post Canon Service Tool Error Code Mean (Error code: 002, 005, 006, 007, 009, etc)
Q: Where can I get other Canon Service Tools?
A: For complete information regarding Canon Service Tool collection, please open Canon Service Tool Version
Q: I don't know which Service Tool supports my printer, where can I get information about it?
A: For complete information regarding Canon printers and the Service Tools used, please open the Canon Service Tools and Supported Printers
A: For complete information regarding Canon printers and the Service Tools used, please open the Canon Service Tools and Supported Printers
A complete discussion regarding Canon iP4700 series repairs, please read Troubleshooting Canon iP4700 series (7 chapters). If you have trouble doing it yourself, we recommend asking for the help of the nearest Canon Service Center or printer repair professional.









I followed the above instructions and it's given my iP4700 a new lease of life. Thank you.
ReplyDeletework flawless for me. TY so much!
ReplyDeleteThank you for this informative guide. I have a question relating to 3. Remove the main case covers left and right. While inserting a flat-blade screwdriver, etc. through into a space under the main case cover; and pressing the claw downward, slide the main case cover toward the front side of the printer.
ReplyDeleteI have not been able to do this. I don't know what the claw is.
Insert a flat screwdriver through the slit then press down on the screwdriver to release the latch (see the red line in the image on the left), then slide the cover to the right to remove it.
DeleteThanks so much! I love my printer, such a shame Canon want me to bin it when it works perfectly and won't even answer an email. I can't get an absorber kit but will try to wash the existing one.
ReplyDelete