How to reset the Epson L200, L201 printer to the error code a printer's ink pad is at the end of its service life
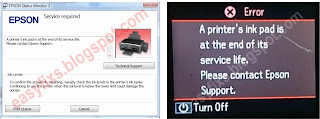
Error message: A printer's ink pad is at the end of its service life. Please contact Epson Support.
Solution
1. Replace the ink pad
2. Reset the waste ink pad counter
1. Replace the ink pad
Since the ink pad has expired, there are two possible solutions. Choose one of the solutions below which you think is the easiest to do.
1a. Replace the ink pad
1b. Modify the waste ink reservoir
1a. Replace the ink pad
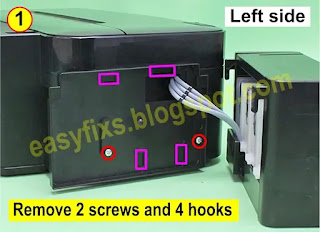
- Look at the left side of the printer, remove the 2 screws and open the 4 hooks
- Look at the back of the printer, remove the 2 screws
- Look at the bottom of the printer, open the 8 hooks
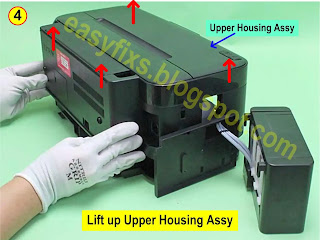
- Remove the Upper housing assy
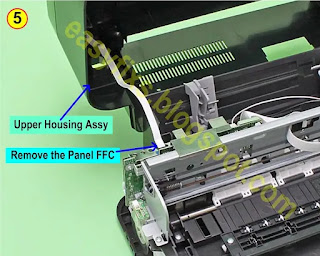
- Remove the Panel FFC cable
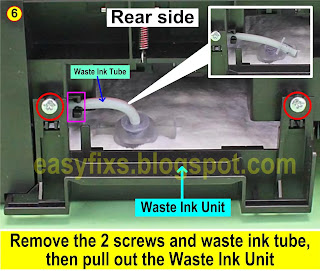
- Remove the 2 screws and waste ink tube
- Pull out the Waste Ink Unit
- Replace with a new one or clean the waste ink pad
- After the waste ink pad has been replaced or cleaned, reinstall the waste ink unit. If a new waste ink pad is available in the market, we recommend replacing it with a new one. If a new waste ink pad is not available, wash the waste ink pad, dry it and then reinstall it.
- After the printer has been assembled, we will then reset the waste ink pad counter.
1b. Modify the waste ink reservoir
Materials
- Plastic hose with a length of 40 cm
- Transparent plastic bottle.
Waste ink reservoir modification procedure
1. Open the small door on the back of the printer
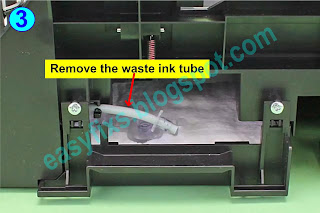
2. Look at the Waste ink tube as shown in the picture
3. Remove the waste ink tube
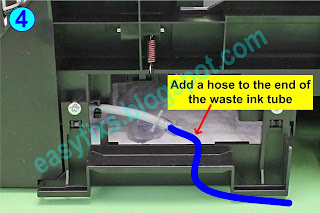
4. Insert the plastic hose at the end of the waste ink tube
5. Make a hole in the small door so that the hose can be directed out, and insert the end of the hose into a transparent plastic bottle. After the waste ink reservoir is transferred to a plastic bottle, the printer can then be reset.
- Download Adjustment Program Epson L200, L201
- Open AdjProg - Select (1) - Port: select USB port Epson L200 / L201 (2) - click OK (3) - Particular adjustment mode (4)
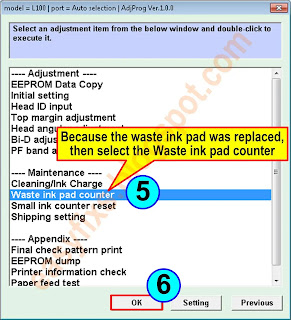
- Select Waste ink pad counter (5) - OK (6)
- Check box (7) on: Main pad counter, FL box counter, Ink tube counter.
- Click Check (8) to find out the value of Main pad counter, FL box counter, Ink tube counter, before resetting. After knowing the three values before resetting, then we will reset the waste ink pad counter.
- Check box on: Main Pad Counter (9). For FL Box Counter and Ink Tube Counter, if the value is close to 100%, then check box the FL box counter and Ink tube counter, but if both values are still far from 100%, then only check box on Main Pad Counter.
- Click Initialization (10) to reset to zero. Follow the instructions that appear on the screen until they are finished during the reset process, after the Initialization process is complete, press Finish (11).
Questions and Answers
Q: There is an error "A printer's ink pad is at the end of its service life" on my printer. If the waste ink pad counter is reset, but the waste ink pad is not replaced or cleaned. Can the printer return to normal?
A: Because the waste ink pad counter has been reset, the printer can be reused, but because the waste ink pad is not replaced or cleaned, in the near future, the waste ink will overflow from the printer because the waste ink pad can no longer hold the waste ink. Resetting the waste ink pad counter becomes effective if the waste ink pad is replaced with a new one.
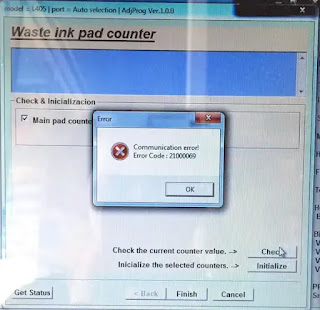
Q: Error Code: 20000xxx when using the Adjustment Program. What to do?
A: Communication error! Error Code: 20000xxx occurs because the printer is not ready to accept commands from the Adjustment Program because it is still busy processing the previous command.
So when the printer receives the command example Main pad counter - Check, the power light will blink for about 60 seconds. The printer can process the next command example Main pad counter - Initialization after 60 seconds have passed. Communication error! Error Code: 20000xxx occurs because the second command "Main pad counter -> Initialization" is done while the printer is still processing the previous command. So wait for the power light to stop flashing, then run the next command.
When an Epson printer error occurs and requires replacement of parts, after the damaged parts are replaced, use the Adjustment Program to rearrange the new parts installed, so that maximum printing results can be maintained. If you are having trouble repairing the printer yourself, we recommend contacting an Epson Authorized Customer Service Center.








Post a Comment for "How to reset the Epson L200, L201 printer to the error code a printer's ink pad is at the end of its service life"