Epson L360, L361, L362, L363 Adjustment Program, Service Manual, Parts List
When there is damage to the Epson printer and one or more spare parts are replaced, after the replacement of parts is complete, make adjustments to the printer with the Adjustment Program software. So when one or more printer parts are replaced, so that the new parts installed can work optimally, an Adjustment Program is needed. The main purpose of using the Adjustment Program is so that the print quality of the printer can be maintained when replacing and installing new spare parts.
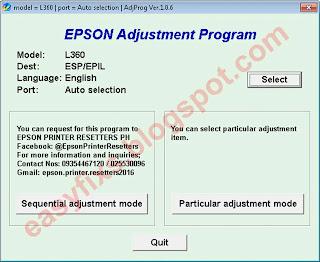
In the Adjustment Program software, there are two modes, namely:
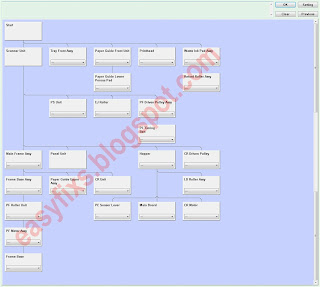
- Sequential adjustment mode is a sequential adjustment item that must be done when one or more spare parts are replaced (repaired), by selecting the replacement part and then you will get a sequence of adjustments that must be made.
There are many adjustment items provided by the Adjustment Program. These customization items have different functions. The following is a list of customization items, their functions, and how to use them.
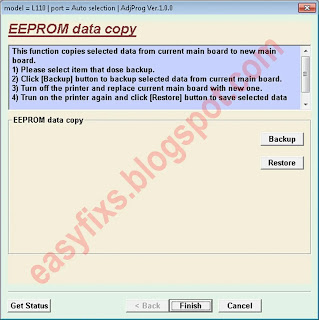
- EEPROM data copy is to copy adjustment values or the like stored on the old Main Board to the new board when the Main Board needs to be replaced. How to do it:
2) Click [Backup] button to backup selected data from current main board.
3) Turn off the printer and replace current main board with new one.
4) Turn on the printer again and click [Restore] button to save selected data on new main board.
- Initialize Setting is to write sale-destination-specific settings and the serial number into the Main Board after replacing it. And also to set the MAC address as necessary. How to do it:
1) Please select item that does initialization, and click the [Perform] button.
- [Initial setting] : Writing initial setting value to EEPROM.- [Product Serial No.] : Writing Product Serial No. to EEPROM.
- [MAC Address] : Writing MAC Address to EEPROM.
2) Click the [Check] button to read out current setting values.NOTE : Please don't execute this function when backing up the EEPROM data with EEPROM Data Copy function.
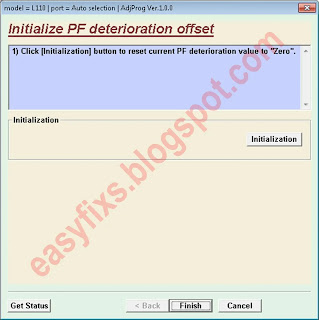
- Initialize PF deterioration offset is to reset the counter or set it to its maximum according to the replaced parts. How to do it:
1) Click [Initialization] button to reset current PF deterioration value to "Zero".
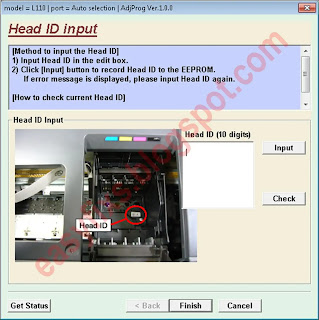
- Head ID input is to correct characteristic variation of the replaced Printhead by entering its Printhead ID (Head ID). How to do it:
1) Input Head ID in the edit box.
2) Click [Input] button to record Head ID to the EEPROM.
If error message is displayed, please input Head ID again.
[How to check current Head ID]
1) Click [Check] button to check current Head ID.
- First dot position adjustment is to correct the print start position in the CR Unit moving direction through software control. How to do it:
2) Click [Print] button to print check pattern.
3) Select the number of the pattern with the best alignment from the list.
4) Choose the selected pattern from the edit box.
5) Click [Input] button to record the parameter to the EEPROM.
[How to select the best line]
1) The printed line on should be 5mm away from each of the paper's edges.
1) Set 4x6 size Photo Paper Glossy(EAI)/Glossy Photo Paper(Euro/Asia) in the ASF.
2) Click [Print] button to print check pattern.
3) Measure the distance between the edge of paper and printed line.
4) Select the proper adjustment value from the measurement result.
5) Click [Input] button to record the selected value to the EEPROM.
1) The printed line on should be 5mm away from each of the paper's edges.
2) Choose the selected pattern from edit box.
- Top margin adjustment is corrects top margin of printout. How to do it:
2) Click [Print] button to print check pattern.
3) Measure the distance between the edge of paper and printed line.
4) Select the proper adjustment value from the measurement result.
5) Click [Input] button to record the selected value to the EEPROM.
[How to select the best line]
1) The printed line on should be 5mm away from each of the paper's edges.
1) Set A4 size Matte Paper-Heavyweight in the ASF.
2) Click [Print] button to print a check pattern.
3) Choose the number of the pattern having the best alignment from the printed check pattern.
4) Input the number in the edit box (both "1 to 80" and "80 to 1" side).
1) Set A4 size Plain Paper (B/W Paper) in the ASF.
2) Click [Print] button to print check pattern of selected dot size.
3) Select the number of the pattern with the best alignment from the list.
4) Choose the selected pattern from the edit box.
5) Click [Input] button to record the parameter to the EEPROM.
1) The printed line on should be 5mm away from each of the paper's edges.
2) Choose the selected pattern from edit box.
- Head angular adjustment is to correct tilt of the Printhead caused at the installation through software control. How to do it:
2) Click [Print] button to print a check pattern.
3) Choose the number of the pattern having the best alignment from the printed check pattern.
4) Input the number in the edit box (both "1 to 80" and "80 to 1" side).
5) Click [Input] button to record the correction parameter to the EEPROM.
- Bi-D adjustment is to correct print start timing in bidirectional printing through software control. How to do it:
2) Click [Print] button to print check pattern of selected dot size.
3) Select the number of the pattern with the best alignment from the list.
4) Choose the selected pattern from the edit box.
5) Click [Input] button to record the parameter to the EEPROM.
For the case where there is no best pattern, you should input the maximum or minimum parameter of the test pattern which ever is most appropriate. The offset value will be printed in the center position the next time the check pattern is printed. Please repeat this adjustment until you can select the best pattern.
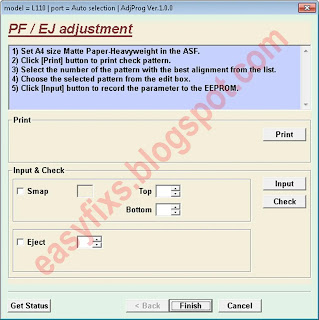
- PF / EJ adjustment is to correct variations in paper feed accuracy to achieve higher print quality. How to do it:
2) Click [Print] button to print check pattern.
3) Select the number of the pattern with the best alignment from the list.
4) Choose the selected pattern from the edit box.
5) Click [Input] button to record the parameter to the EEPROM.
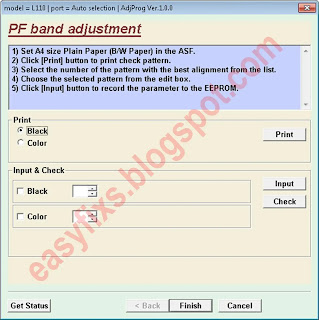
- PF band adjustment is to correct variations in paper feed accuracy to achieve higher print quality in band printing. How to do it:
2) Click [Print] button to print check pattern.
3) Select the number of the pattern with the best alignment from the list.
4) Choose the selected pattern from the edit box.
5) Click [Input] button to record the parameter to the EEPROM.
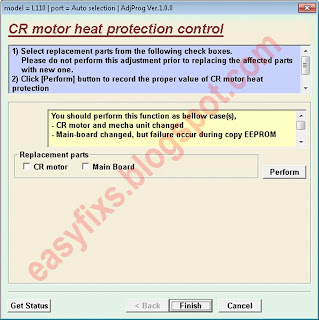
- CR motor heat protection control is to measure and correct the electrical variation of the motor and the power supply board. How to do it:
2) Click [Perform] button to record the proper value of CR motor heat protection to the EEPROM for the selected replacement parts. (This operation, it takes about 1 min.)
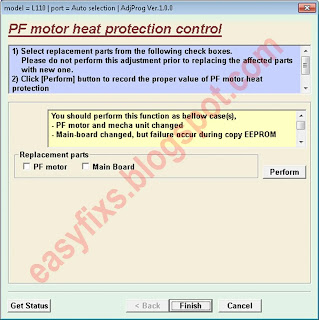
- PF motor heat protection control is to measure and correct the electrical variation of the motor and the power supply board. How to do it:
2) Click [Perform] button to record the proper value of PF motor heat protection to the EEPROM for the selected replacement parts. (This operation, it takes about 1 min.)
- Ink charge / Cleaning is to fill ink inside the new Printhead to make it ready for print after replacing the Printhead. How to do it:
2) Click [Print] button to print nozzle check pattern print.
3) If dot missing appears, click [Cleaning] button to perform a cleaning.
4) Click [Print] button to print nozzle check pattern print again.
5) If dot missing is not recovered, repeat from step 3) to step 4)
- Waste ink pad counter is to reset the waste ink counter after replacing the Waste Ink Pad Assy. How to do it:
2) Replace waste ink pad with new one.
3) Click [Initialization] to reset current protection counter to the initial value.
NOTE : You have to replace waste ink pad if you initialize the protection counter.
- Shipping setting
2) If "Set cleaning flag" is enabled, cleaning will be executed when printer is turned on in the next time.
3) If "Set initial charge flag" is enabled, initial ink charge will be executed when printer is turned on in the next time.
4) If "Reset the flag" is enabled, cleaning flag or initial charge flag is disabled.
Example of using Adjustment Program
Printer status: A printer's ink pad is at the end of its service life. Please contact Epson support.
All Epson ink jet products have a limited life due to wear and tear of parts during normal use. At some point, the printer will reach a state where components have reached the end of their useful life and satisfactory print quality cannot be maintained. This is the life cycle of a highly mechanical device such as a printer. You can temporarily clear this maintenance message by using the Epson Adjustment Program software. This utility is used after you replace the waste ink pad.
In the case of "A printer's ink pad is at the end of its service life". If a Utility has been previously used on your printer, it cannot be used again in the same case to minimize the risk of property damage because when this message appears, other printer components have also expired and satisfactory print quality cannot be maintained. The following are two stages of repair that must be carried out.
Step 1. Replacing the waste ink pad
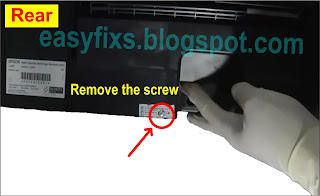
- Look at the back of the printer. Remove the screws at the bottom.
- Tilt the printer and look at the bottom. Swipe right waste ink pad assy.
- Pull out the waste ink pad assy to remove it.
- Replace the waste ink pad with a new one. It is highly recommended to replace the waste ink pad with a new one. New waste ink pads can be purchased in the market. If a new waste ink pad is not available in the market, an alternative solution, you can clean it, dry it, and reuse it. Make sure the waste ink pad is completely dry before reuse.
- After the new waste ink pad has been replaced, reinstall the waste ink pad assy. Next we will reset the waste ink pad counter.
Step 2. Reset the waste ink pad counter
To reset the printer can be done in two ways, namely Sequential adjustment mode and Particular adjustment mode. In the discussion below, we will use the Particular adjustment mode.
1. After replacing the waste ink pad, connect the printer to the computer with a USB cable, then turn on the printer.
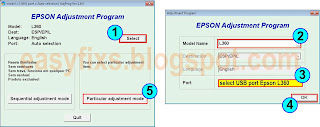
2. Open AdjProg - Select (1) - Model name: L360 (2) - Port: select USB port Epson L360 (3) - OK (4) - Particular adjustment mode (5)
3. Waste ink pad counter (6) - OK (7)
4. To find out the Main pad counter value before resetting, follow the following procedure. Check the Main pad counter (8) - then click Check (9). If the Main pad counter value is equal to 100% or close to 100% then the Main pad counter must be reset to zero. Next we will reset the Main pad counter to zero.
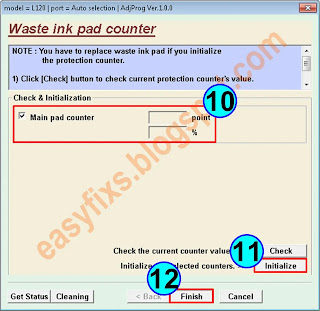
5. Check Main pad counter (10) - then click Initialize (11). On the computer screen will appear several instructions that you must follow. Follow all the instructions that appear on the screen to completion. After all the instructions are done, press Finish (12) and close the Adjustment Program. Done.
Revision: A
Table of contents:
Chapter 2. Disassembly / Reassembly (describes the disassembly/reassembly procedures for main parts/units of the product, and provides the standard operation time for servicing the product.)
Chapter 3. Adjustment (describes the required adjustments for servicing the product.)
Chapter 4. Maintenance (describes maintenance items and procedures for servicing the product.)
Chapter 5. Appendix (provides the following additional information for reference.)
Support printers: Epson L360 / L362 / L363
Adjustment Program Epson L360
There are three Epson L360 Adjustment Programs (choose one)
1. Adjustment Program Epson L360 - ECC ver.1.0.1
2. Adjustment Program Epson L360 - ESP/EPIL ver.1.0.0
3. Adjustment Program Epson L360 - ESP/EPIL ver.1.0.6
Destination: ECC
Version: 1.0.1
Note: Instructions for using the Adjustment Program, please read the paragraph above.
Destination: ESP/EPIL
Version: 1.0.0
Note: Instructions for using the Adjustment Program, please read the paragraph above.
Destination: ESP/EPIL
Version: 1.0.6
Note: Instructions for using the Adjustment Program, please read the paragraph above.
Adjustment Program Epson L361
Adjustment Program Epson L361 - ECC ver.1.0.0
Destination: ECC
Version: 1.0.0
Note: Instructions for using the Adjustment Program, please read the paragraph above.
Adjustment Program Epson L362
Adjustment Program Epson L362 - CIS ver.1.0.1
Destination: CIS
Version: 1.0.1
Note: Instructions for using the Adjustment Program, please read the paragraph above.
Adjustment Program Epson L363
There are two Epson L363 Adjustment Programs (choose one)
1. Adjustment Program Epson L363 - ECC ver.1.0.0
2. Adjustment Program Epson L363 - ECC ver.1.0.1
Adjustment Program Epson L363 - ECC ver.1.0.0
Destination: ECC
Version: 1.0.0
Note: Instructions for using the Adjustment Program, please read the paragraph above.
Adjustment Program Epson L363 - ECC ver.1.0.1
Destination: ECC
Version: 1.0.1
Note: Instructions for using the Adjustment Program, please read the paragraph above.
Questions and Answers
Q: There is an error "A printer's ink pad is at the end of its service life" on my printer. If the waste ink pad counter is reset, but the waste ink pad is not replaced or cleaned. Can the printer return to normal?
A: Because the waste ink pad counter has been reset, the printer can be reused, but because the waste ink pad is not replaced or cleaned, in the near future, the waste ink will overflow from the printer because the waste ink pad can no longer hold the waste ink. Resetting the waste ink pad counter becomes effective if the waste ink pad is replaced with a new one.
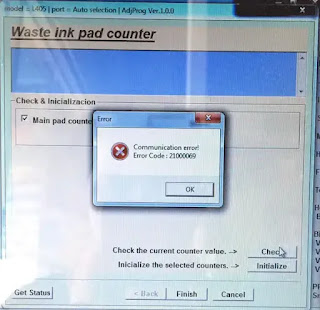
Q: Error Code: 20000xxx when using the Adjustment Program. What to do?
A: Communication error! Error Code: 20000xxx occurs because the printer is not ready to accept commands from the Adjustment Program because it is still busy processing the previous command.
So when the printer receives the command example Main pad counter - Check, the power light will blink for about 60 seconds. The printer can process the next command example Main pad counter - Initialization after 60 seconds have passed. Communication error! Error Code: 20000xxx occurs because the second command "Main pad counter -> Initialization" is done while the printer is still processing the previous command. So wait for the power light to stop flashing, then run the next command.
When there is damage to the Epson printer and requires replacement of spare parts, after the damaged parts are replaced, then use the Adjustment Program to reset the printer so that it can work optimally with new spare parts. If you are having trouble repairing a faulty printer yourself, we recommend contacting an Epson Authorized Customer Service Center.














Post a Comment for "Epson L360, L361, L362, L363 Adjustment Program, Service Manual, Parts List"