Epson L110, L111 Adjustment Program, Service Manual, Parts List
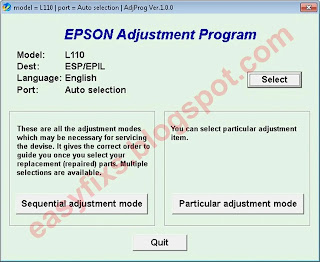
Adjustment Program is a tool to reset Epson printers that are used when one or more parts of the printer are removed or replaced due to damage. When a printer repair is performed, and one or more parts are removed or replaced, in order for the printer's print quality to be maintained after repair, the printer must be reset using the Adjustment Program utility software.
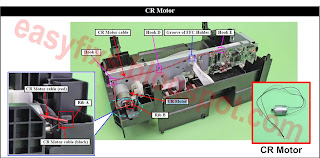
Here's how to reset the printer after replacing the CR Motor
3. CR Motor: Replacement (6), Hopper: Removal (7), then click OK (8)
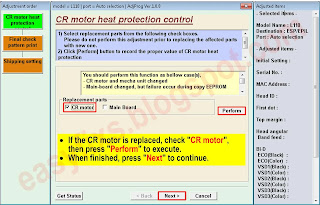
4. Because the CR motor is replaced, check "CR motor", then press "Perform" to execute. When finished, press "Next" to continue.
Here's how to reset the printer after replacing the Waste ink pad
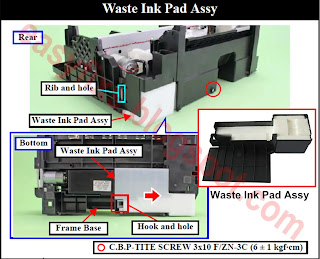
The waste ink pad assy for the Epson L110 / L111 is on the back, the bottom side of the printer. Here's how to remove the waste ink pad assy.
2. Reset the waste ink pad counter
Service Manual, Parts List, Adjustment Program
Epson L110, L111 Service Manual
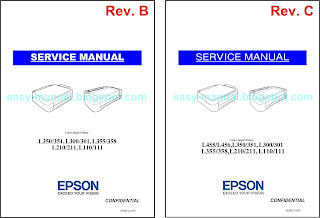
There are two Service Manuals that can be downloaded, namely
Epson L110, L111 Service Manual Rev. B - Download
Epson L110, L111 Service Manual Rev. C - Download
Questions and Answers
Based on the information in the Epson L110, L111 Service Manual, the following is an example of using the Adjustment Program when one part is removed or replaced.
1. CR Motor Replacement
- When the part is removed: no adjustment needed
- When the part is replace: CR motor heat protection control. Purpose to measure and correct the electrical variation of the motor and the power supply board.
1. After replacing the CR Motor, connect the printer to the computer with a USB cable, then turn ON the printer.
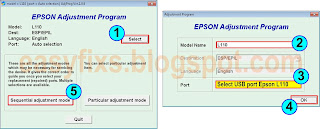
2. Open AdjProg, click Select (1), Model Name: L110 (2), Port: select USB Port Epson L110 (3), click OK (4), click Sequential adjustment mode (5).
4. Because the CR motor is replaced, check "CR motor", then press "Perform" to execute. When finished, press "Next" to continue.
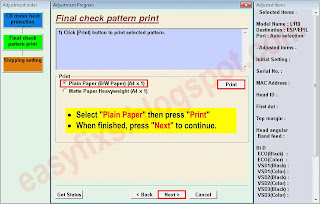
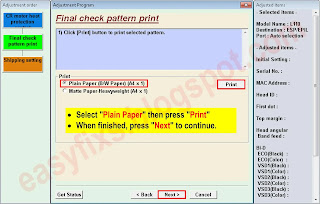
5. Print check pattern. Select "Plain Paper" then press "Print", when finished, press "Next" to continue.
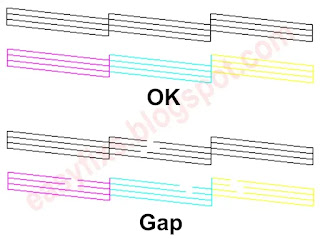
6. Shipping setting. If the print out pattern is "OK" (see image above), select Finish.
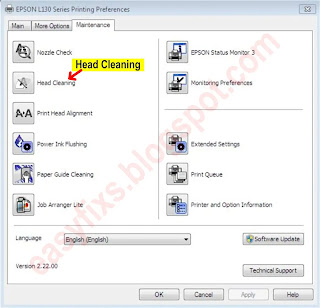
7. Shipping setting. If the print out pattern is "Gap" (see image above), select Finish then close AdjProg, Open Printing Preferences - Maintenance - Head Cleaning.
2. Waste Ink Pad Assy Replacement
- When the part is removed: no adjustment needed
- When the part is replace: Waste ink pad counter. Purpose: to reset the waste ink counter after replacing the Waste Ink Pad Assy.
1. After replacing the waste ink pad, connect the printer to the computer with a USB cable, then turn ON the printer.
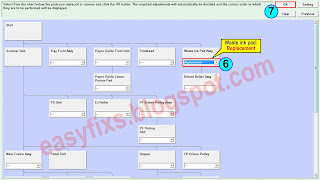
2. Open AdjProg, click Select (1), Model Name: L110 (2), Port: select USB Port Epson L110 (3), click OK (4), click Sequential adjustment mode (5).
3. Waste ink pad: Replacement (6) then click OK (7)
4. Check the "Main pad counter" then click "Check" to find out the Main pad counter value before resetting it.
5. If the Main pad counter is equal to 100% or close to 100%, then we will reset the Main pad counter to zero.
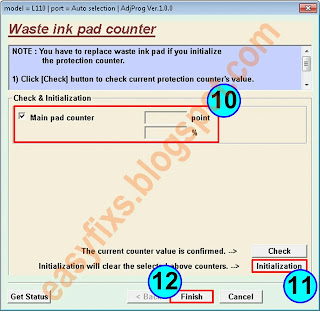
6. Check the "Main pad counter" then click "Initialization" to reset the Main pad counter to zero. Follow the procedure that appears on the screen to completion, then press "Next" to continue.
7. Print check pattern. Select "Plain Paper" then press "Print", when finished, press "Next" to continue.
8. Shipping setting. If the print out pattern is "OK" (see image above), select Finish.
9. Shipping setting. If the print out pattern is "Gap" (see image above), select Finish then close AdjProg, Open Printing Preferences - Maintenance - Head Cleaning.
The following is an example of using the Adjustment Program
Error message: A printer's ink pad is at the end of its service life. Please contact Epson Support.
If the error message below appears, it means the waste ink pad is full, and the waste ink pad counter has reached 100%. Here is the solution to this problem.
Solution
1. Replacing the waste ink pad
2. Reset the waste ink pad counter
1. Replacing the waste ink pad
- Look at the back of the printer. Remove the bolts at the bottom
- Tilt the printer and then remove the Waste Ink Pad Assy
- We recommend replacing the waste ink pad with a new one. If the waste ink pad is not commercially available, an alternative solution is to clean the waste ink pad, dry it, and then reinstall it. Make sure the waste ink pad is completely dry before installing.
- After replacing the waste ink pad, reinstall the waste ink pad assy, then turn on the printer.
To reset the waste ink pad counter, it can be done in two ways, namely Sequential adjustment mode and Particular adjustment mode. For the Sequential adjustment mode, it has been discussed in the discussion above. Next we will reset the waste ink pad counter with the Particular adjustment mode method.
- After the Waste ink pad assy is finished installing, turn on the printer, connect the printer to the PC with a USB cable. Adjustment program can be used on Windows operating system (10, 8, 7, Vista, XP), with a USB cable connection (not wireless).
- Open AdjProg - Select (1) - Model Name: L110 (2) - Port: select USB port Epson L110 (3) - click OK (4) - Particular adjustment mode (5)
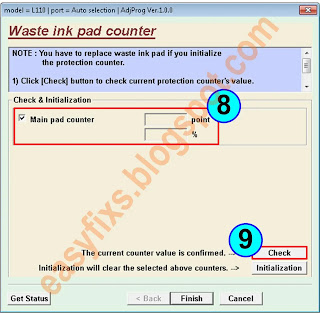
- Check the Main pad counter (8) then click Check (9) to find out the value of Main pad counter before resetting. If the Main pad counter value is equal to 100% or close to 100%, it means the waste ink pad is full. Next we will reset the waste ink pad counter to zero.
About Epson Adjustment Program
- Adjustment Program only works on Windows Operating System (10, 8, 7, Vista, XP).
- Adjustment Program is portable software, and can be used if the printer driver is installed in the Operating System.
- The Adjustment Program can be used if the printer is connected to a computer with a USB cable (not wireless).
- The following is a list of parts of the printer that require an adjustment program when removed or replaced: Tray Front Assy, Star Wheel Holder Assy, Paper Guide Front Unit, Printhead, Waste Ink Pad Assy, Retard Roller Assy, Scanner Unit, Scanner Motor, PS Unit, PF Driven Pulley Assy, PF Timing Belt, EJ Roller, Hopper, LD Roller Assy, CR Motor, PE Sensor Lever, Main Board, CR Driven Pulley, Main Frame Assy, Paper Guide Upper Assy, CR Unit, CR Timing Belt, Frame Base Assy , PF Roller Unit, PF Motor Assy, Frame Base. Please read the printer's Service Manual for more information.
- On the error "A printer's ink pad is at the end of its service life". When this error occurs, it is not only the waste ink pads that have expired, but there is a possibility that other parts have also expired. This is a normal cycle of a mechanical device such as a printer.
- Use of the Adjustment Program to reset the waste ink pad counter becomes effective if the waste ink pad is replaced or cleaned.
- The waste ink pad counter can only be reset once, in the case of "A printer's ink pad is at the end of its service life". So the printer cannot be reset if this error message appears for the second time.
Service Manual, Parts List, Adjustment Program
Epson L110, L111 Service Manual
There are two Service Manuals that can be downloaded, namely
Epson L110, L111 Service Manual Rev. B - Download
Epson L110, L111 Service Manual Rev. C - Download
Epson L110, L111 Parts List
Supported models: Epson L110, L111
There are three Adjustment Programs for Epson L110 (choose one), while the instructions for using the Adjustment Program, please read the paragraph above.
- Adjustment Program Epson L110 - ESP EPIL ver.1.0.0
- Adjustment Program Epson L110 - ESP EPIL ver.1.0.4
- Adjustment Program Epson L110 - ESP EPIL ver.1.0.6
Adjustment Program Epson L110 - ESP/EPIL ver.1.0.0
Destination: ESP/EPIL
Destination: ESP/EPIL
Version: 1.0.0
Tutorial: How to use AdjProg Epson L110
Adjustment Program Epson L110 - ESP/EPIL ver.1.0.4
Destination: ESP/EPIL
Version: 1.0.4
Tutorial: How to use AdjProg Epson L110
Adjustment Program Epson L110 - ESP/EPIL ver.1.0.6
Destination: ESP/EPIL
Version: 1.0.6
Tutorial: How to use AdjProg Epson L110
There are two Adjustment Programs for Epson L111 (choose one), while the instructions for using the Adjustment Program, please read the paragraph above.
- Adjustment Program Epson L111 - ECC ver.1.0.6 v1
- Adjustment Program Epson L111 - ECC ver.1.0.6 v2
Adjustment Program Epson L111 - ECC ver.1.0.6 v1
Adjustment Program Epson L111 - ECC ver.1.0.6 v2
Q: There is an error "A printer's ink pad is at the end of its service life" on my printer. If the waste ink pad counter is reset, but the waste ink pad is not replaced or cleaned. Can the printer return to normal?
A: Because the waste ink pad counter has been reset, the printer can be reused, but because the waste ink pad is not replaced or cleaned, in the near future, the waste ink will overflow from the printer because the waste ink pad can no longer hold the waste ink . Resetting the waste ink pad counter becomes effective if the waste ink pad is replaced with a new one.
Q: Error Code: 20000xxx when using the Adjustment Program. What to do?
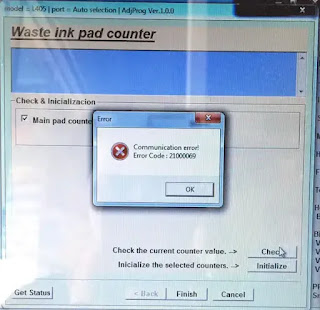
A: Communication error! Error Code: 20000xxx occurs because the printer is not ready to accept commands from the Adjustment Program because it is still busy processing the previous command.
So when the printer receives the command example Main pad counter - Check, the power light will blink for about 60 seconds. The printer can process the next command example Main pad counter - Initialization after 60 seconds have passed. Communication error! Error Code: 20000xxx occurs because the second command "Main pad counter -> Initialization" is done while the printer is still processing the previous command. So wait for the power light to stop flashing, then run the next command.
When an Epson printer error occurs and requires replacement of parts, after the damaged parts are replaced, use the Adjustment Program to rearrange the new parts installed, so that maximum printing results can be maintained. If you are having trouble repairing the printer yourself, we recommend contacting an Epson Authorized Customer Service Center.










Post a Comment for "Epson L110, L111 Adjustment Program, Service Manual, Parts List"