How to Fix Canon iP4900, iP4910, iP4920, iP4930, iP4940, iP4950, iP4970, iP4980 Ink Absorber Full Error, error code 5B00, 1700
Every time the printer does cleaning or deep cleaning, it will produce waste ink. This ink waste is collected in an ink absorber at the bottom of the printer machine. When the ink absorber is almost full (D=095.0 or 95%) a warning appears "The ink absorber becomes almost full, error code [1700]". When this warning appears, printing can still be done by pressing the Resume / Cancel button without replacing the ink absorber. When the ink absorber is full (D=100.0 or 100%), when the printer is turned on the Power LED will light green and orange alternately 7 times, and when checking the printer status, the message "Ink absorber full, error code [5B00]" appears.
The solution below is for the printer
- Canon iP4900 series: Canon iP4900, iP4910, iP4920, iP4930, iP4940, iP4950, iP4970, iP4980
List of contents
1. Problem Description
2. Solution
2a. Replace ink absorber
2b. Reset the printer
3. Questions and Answers
This error occurs twice, namely when the main waste ink counter value is almost full or the value D=095.0 (or the so-called Operator Call Error) and when the main waste ink counter value is full or the value D=100.0 (or called Service Call Error). Improvements can be made when the value of D=095.0 (Operator Call Error) or when D=100.0 (Service Call Error).
Operator Call Errors
LED (Blinking in orange): 8 times
Error: Warning: The ink absorber becomes almost full.
Error code: 1700
Main waste ink counter value D=095.0
Service Call Errors
Cycles of LEDs blinking: 7 times
Error: Ink absorber full
Error code: [5B00]
Main waste ink counter value D=100.0
2. Solution
Printer repair is carried out in two stages. The first step is to replace the ink absorber with a new one. After the ink absorber has been replaced the second step is to reset the waste ink counter to zero or reset the D value to zero. Here are the steps for repairing the printer.
2a. Replace ink absorber
Because the ink absorber is under the printing machine, to replace or clean it, the printer must be disassembled. Follow the procedure below on how to disassemble Canon iP4900 series.1. Remove the Cassette Cover, Cassette Unit, and Print Head.
2. Remove the AC Adapter, Rear Guide Unit, and Cover Rear Guide.
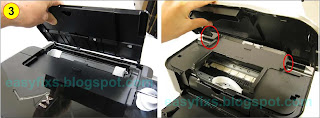
3. Remove the paper support unit and top cover. While gently pushing the center of the top cover outwards, loosen the round protrusions on the left and right sides.
4. Remove the left cover and right cover on the main frame. With the help of the gap under the cover, push down the protruding part of the lead card of the main frame, and slide the cover to separate it from the main frame.
5. Remove the left side cover.
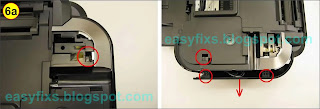
6. Remove the right side cover.
7. Remove the front bezel unit. While gently pushing the center of the front fence unit outwards, loosen the round protrusions on the left and right sides.
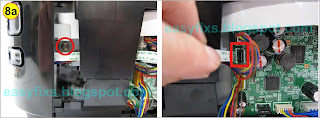
8. Remove the control board cover unit.
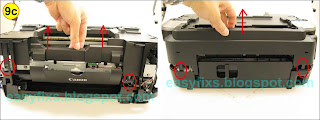
9. Remove the main frame.
10. Replacement of waste ink absorber.
If you only need to replace the waste ink absorber (due to a full waste ink absorber, etc.) without replacing other engine parts, you can replace the waste ink absorber by simply separating the printing unit from the chassis. There is no need to disassemble the entire engine unit.
- Disconnect the DC harness from the logic board (right side of the printer).
- Remove the 6 screws that fix the switch system unit and the base frame, and clean the drive system unit and the base frame (see the exact location of the screw).
11. Remove the printer unit from the base frame.
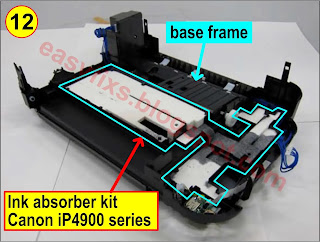
12. Remove the ink absorber from the base frame then replace the ink absorber. If a new ink absorber for Canon iP4900 series is not available in the market, the alternative solution is to clean the ink absorber, and use it again.
13. Replace the ink absorber in the correct position. Since the ink absorber consists of several absorbent sheets, when removing the ink absorber, pay attention to the position of each part, and make sure that the ink absorber is reinserted properly.
After the ink absorber has been replaced or cleaned, carefully assemble the printer again. Make sure, the printer assembly is done properly. After assembly is complete, repairs continue with resetting the main waste ink counter to zero.
Continue reading How to Reset the Canon iP4900 series











Post a Comment for "How to Fix Canon iP4900, iP4910, iP4920, iP4930, iP4940, iP4950, iP4970, iP4980 Ink Absorber Full Error, error code 5B00, 1700"