Epson L100, L101 Adjustment Program, Service Manual, Parts List
The Epson Adjustment Program is an adjustment program that is used when the printer has been disassembled, either replacing parts or not replacing parts, so that the printer returns to normal and print quality can be maintained. Replacement of one or more parts is carried out when there is damage to the printer, such as: replacement of Mainboard, Power supply unit, Carriage Assy, PCB Encoder, CR Motor, Printhead, EJ Roller, LD Roller Assy, Waste Ink Pads, etc.
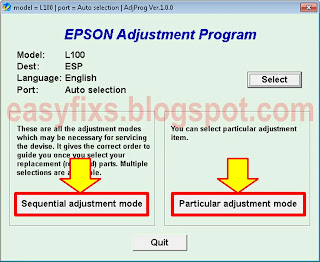
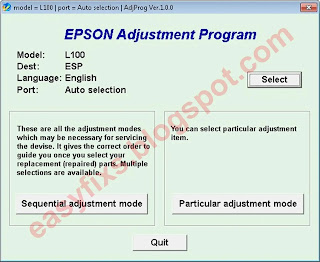
There are two main modes in the Adjustment Program, namely Sequential adjustment mode and Particular adjustment mode. Sequential adjustment is the adjustment modes which may be necessary for servicing the devise and it gives the correct order to guide you once you select your replacement (repaired) parts. Particular adjustment is you can select particular adjustment item.
The following is an example of using the Adjustment Program if the ink pad is replaced
1. Sequential adjustment mode
1. Sequential adjustment mode
Sequential adjustment is the adjustment modes which may be necessary for servicing the devise. It gives the correct order to guide you once you select your replacement (repaired) parts. Multiple selections are available. Below is an example of using the Sequential adjustment mode after replacing the ink pad.
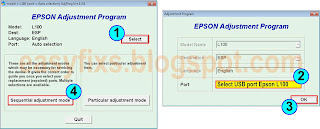
a. Open AdjProg - Select (1) - Port: select USB port Epson L100 / L101 (2) - click OK (3) - Sequential adjustment mode (4)
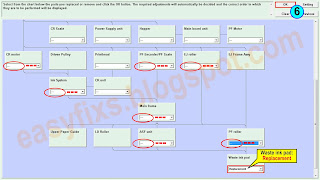
b. Waste ink pad: select Replacement (5). Select "Replacement" if the waste ink pad is cleaned and reused.
For sections marked with "?" such as CR motor, PF Encorder/PF Scale, EJ Roller, Ink System, Main frame, ASF unit, PF roller, because these parts are not removed or replaced, then change the option from "Removal" to "---". After that, press OK (6) to continue.
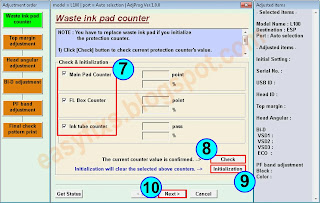
c. Reset the waste ink pad counter. Pay attention to the adjustment order for waste ink pads replacement (see image below.)
- Waste ink pad counter is to reset the waste ink counter / the ink tube counter after Replacing the Waste Ink Pad / the Tube Assy.
- Top margin adjustment is to correct top margin of printout.
- Head angular adjustment is to correct tilt of the Print head caused at the installation by software.
- Bi-D adjustment is to correct print start timing in bidirectional printing by software.
- PF band adjustment is to correct variations in paper feed accuracy in order to achieve higher print quality in band printing.
To reset the waste ink pad counter, follow the procedure below:
- Check box (7) on: Main pad counter, FL box counter, Ink tube counter.
- Click Check (8) to find out the value of Main pad counter, FL box counter, Ink tube counter, before resetting. After knowing the three values before resetting, then we will reset the waste ink pad counter.
- Check box on: Main Pad Counter
- For FL Box Counter and Ink Tube Counter, if the value is close to 100%, then check the FL box counter and Ink tube counter boxes, but if both values are still far from 100%, then only check box on Main Pad Counter..
- Click Initialization (9) to reset to zero.
- Follow the instructions that appear on the screen until they are finished during the reset process, after the Initialization process is complete, press Next (10) to proceed to the next mode.
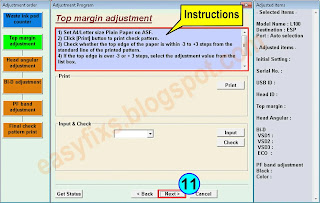
d. Top margin adjustment (to correct top margin of printout).
2) Click [Print] button to print check pattern.
3) Check whether the top edge of the paper is within -3 to +3 steps from the standard line of the printed pattern.
4) If the top edge is over -3 or + 3 steps, select the adjustment value from the list box.
5) Click [Input] button to record the selected value to the EEPROM.
6) Click Next (11) to continue
e. Head angular adjustment (to correct tilt of the Print head caused at the installation by software).
2) Click [Print] button to print check pattern.
3) Select the number of the pattern with the best alignment from the list.
4) Choose the selected pattern from the edit box.
5) Click [Input] button to record the parameter to the EEPROM. For the case where there is no best pattern, you should input the maximum or minimum parameter of the test pattern which ever is most appropriate. The offset value will be printed in the center position the next time the check pattern is printed. Please repeat this adjustment until you can select the best pattern.
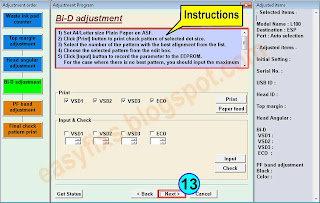
f. Bi-D adjustment (to correct print start timing in bidirectional printing by software)
2) Click [Print] button to print check pattern of selected dot size.
3) Select the number of the pattern with the best alignment from the list.
4) Choose the selected pattern from the edit box.
5) Click [Input] button to record the parameter to the EEPROM. For the case where there is no best pattern, you should input the maximum or minimum parameter of the test pattern which ever is most appropriate. The offset value will be printed in the center position the next time the check pattern is printed. Please repeat this adjustment until you can select the best pattern.
g. PF band adjustment (to correct variations in paper feed accuracy in order to achieve higher print quality in band printing).
2) Click [Print] button to print check pattern.
3) Select the number of the pattern with the best alignment from the list.
4) Choose the selected pattern from the edit box.
5) Click [Input] button to record the parameter to the EEPROM.
h. Final check pattern print (to check print pattern). Load paper (A4 or Letter), then press Print (15). After printing is complete, press Finish (16) to end the Sequential adjustment mode.
2. Particular adjustment mode
Particular adjustment is you can select particular adjustment item. Below is an example of using the particular adjustment mode after replacing the ink pad.
a. Open AdjProg - Select (1) - Port: select USB port Epson L100 / L101 (2) - click OK (3) - Particular adjustment mode (4)
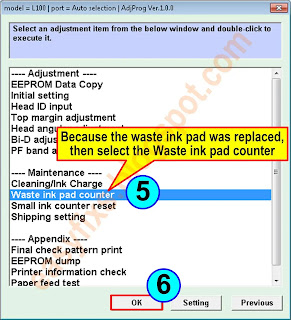
b. Select Waste ink pad counter (5) - OK (6)
c. Check box (7) on: Main pad counter, FL box counter, Ink tube counter.
d. Click Check (8) to find out the value of Main pad counter, FL box counter, Ink tube counter, before resetting. After knowing the three values before resetting, then we will reset the waste ink pad counter.
e. Check box on: Main Pad Counter (9). For FL Box Counter and Ink Tube Counter, if the value is close to 100%, then check box the FL box counter and Ink tube counter, but if both values are still far from 100%, then only check box on Main Pad Counter.
f. Click Initialization (10) to reset to zero. Follow the instructions that appear on the screen until they are finished during the reset process, after the Initialization process is complete, press Finish (11).
About Epson Adjustment Program
- Adjustment program is a tool used to reset Epson printers because parts have been removed or replaced so that maximum print quality can be maintained.
- There are two options in the Adjustment Program, namely Sequential adjustment mode and Particular adjustment mode. Sequential adjustment is the adjustment modes which may be necessary for servicing the devise and it gives the correct order to guide you once you select your replacement (repaired) parts with multiple selections are available. Particular adjustment is you can select particular adjustment item.
- Adjustment program is used when replacing parts such as: Main bord, Power supply unit, Carriage Assy, PCB Encoder, CR Motor, Printhead, EJ Roller, LD Roller Assy, Waste Ink Pads, etc.
- For error messages such as: DC motor error (error code: 01H, 04H, 02H), Printhead system error (error code: 03H, 08H, 09H), Sequence error (error code: 0AH), Logic error (error code: 0CH) ), etc, which require replacement of parts, use the Adjustment Program to reset the printer due to the installation of new parts.
- In the case of "A printer's ink pad is at the end of its service life". You can temporarily clear this error message by replacing the Waste Ink Pad and resetting the printer with the Adjustment Program.
- In the case of "A printer's ink pad is at the end of its service life". When this message appears, it is not only the waste ink pad that has expired, but other printer components may also be nearing the end of their life, so that satisfactory print quality cannot be maintained because the components have reached the end of their useful life.
- The Epson Adjustment Program is only for Windows operating systems (10, 8, 7, Vista, XP) and the adjustment program can only be used once in the case of "A printer's ink pad is at the end of its service life."
Service Manual, Parts List, Adjustment Program
Epson L100/L101 Service Manual Rev. A
Table of contents: Details of Disassembling/Reassembling by Parts/Unit, Required Adjustments, Details of Adjustments, Maintenance (Cleaning, Lubrication, Lubrication Points and Instructions), Connector Diagram, Troubleshooting, Fatal Error Code.
Epson L100/L101 Parts List
Supported printers: Epson L100/L101
Adjustment Program Epson L100 - ESP ver.1.0.0
Version: 1.0.0
Destination: ESP
Adjustment Program Epson L101 - ESP ver. 1.0.0
This is the Epson L100 Adjustment Program, but can be used for the Epson L101 type. This is based on the information in the Service Manual and Parts List. Instructions for use are in the file link.
Version: 1.0.0
Destination: ESP
Questions and Answers
Q: There is an error "A printer's ink pad is at the end of its service life" on my printer. If the waste ink pad counter is reset, but the waste ink pad is not replaced or cleaned. Can the printer return to normal?
A: Because the waste ink pad counter has been reset, the printer can be reused, but because the waste ink pad is not replaced or cleaned, in the near future, the waste ink will overflow from the printer because the waste ink pad can no longer hold the waste ink. Resetting the waste ink pad counter becomes effective if the waste ink pad is replaced with a new one.
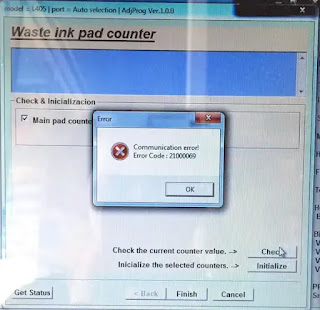
Q: Error Code: 20000xxx when using the Adjustment Program. What to do?
A: Communication error! Error Code: 20000xxx occurs because the printer is not ready to accept commands from the Adjustment Program because it is still busy processing the previous command.
So when the printer receives the command example Main pad counter - Check, the power light will blink for about 60 seconds. The printer can process the next command example Main pad counter - Initialization after 60 seconds have passed. Communication error! Error Code: 20000xxx occurs because the second command "Main pad counter -> Initialization" is done while the printer is still processing the previous command. So wait for the power light to stop flashing, then run the next command.
When an Epson printer error occurs and requires replacement of parts, after the damaged parts are replaced, use the Adjustment Program to rearrange the new parts installed, so that maximum printing results can be maintained. If you are having trouble repairing the printer yourself, we recommend contacting an Epson Authorized Customer Service Center.









Post a Comment for "Epson L100, L101 Adjustment Program, Service Manual, Parts List"