Epson L110, L111, L210, L211, L300, L301, L350, L351, L355, L358 Service Manual
This Service Manual consists of five chapters, which are intended for repair service personnel and includes the information necessary to properly maintain and service the product. Chapter 1 - Troubleshooting, this chapter describes a step-by-step procedure for troubleshooting. Chapter 2 - Disassembly and Reassembly, describes the procedure for disassembling the printer, reassembling each of the main parts and units of the printer, and providing standard uptime for repairing the product. Chapter 3 - Adjustments, contains an explanation of how to make the necessary adjustments to improve the product. Chapter 4 - Maintenance, contains an explanation of how to maintain and repair products. Chapter 5 - Appendix, contains additional information for reference, including: Connector Diagram, Points to be checked before packing the printer, and Protection for Transportation.
Summary
Epson L110 series: L110/L111
Epson L210 series: L210/L211
Epson L300 series: L300/L301
Epson L350 series: L350/L351
Epson L355 series: L355/L358
Epson L210 series: L210/L211
Epson L300 series: L300/L301
Epson L350 series: L350/L351
Epson L355 series: L355/L358
Summary
How to place the ink tank assy when disassembling or reassembling
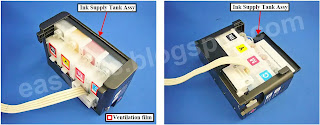
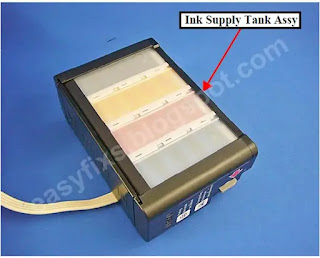
The film under sealing film attached on the Ink Supply Tank Assy of this printer is ventilation film. The ink in the ink tanks is vented to atmosphere through this film to keep ink supply to the print head stable. If the film gets wet with ink, the ink in the tanks is not properly vented and printing may not be capable. In order to prevent this from occurring, make sure to place the Ink Supply Tank Assy as shown below after removing it.
Do not place the Ink Supply Tank Assy with its film side down. Otherwise, ink in the Ink Supply Tank Assy may reach and cover the ventilation film, and the printing failure may occur.
How to empty the ink from the ink tank assy
Discharging ink is recommended only when disconnecting the Ink Supply Tank Tube Assy from the Ink Supply Tank. Before performing the above disconnection, discharge ink from the Ink Supply Tank as follows.
Discharge all ink in the Ink Supply Tank.
1. Remove the Housing Rear, Scanner Unit, Housing Left, Hinge, Housing Right.
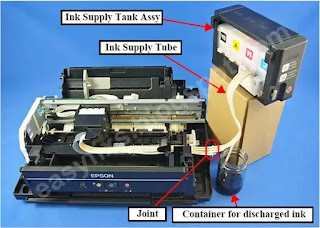
2. With the choke value closed, place the Ink Supply Tank Assy on a place where its bottom is higher than the top of the Print head.
3. Prepare a container for ink to discharge, then disconnect the Ink Supply Tube from the joint and put its tip into the container for the ink.
2. With the choke value closed, place the Ink Supply Tank Assy on a place where its bottom is higher than the top of the Print head.
3. Prepare a container for ink to discharge, then disconnect the Ink Supply Tube from the joint and put its tip into the container for the ink.
4. Open the choke valve to discharge the ink in the Ink Supply Tank Assy to the container.
5. When the ink stops flowing from the tube, close the choke valve, and then connect the Ink Supply Tube back to the joint.
6. Disconnect the Ink Supply Tube of the same color connected to the opposite side of the joint.
7. Connect the tube from the injector.
8. Open the choke valve again, and suck up the remaining ink in the Ink Supply Tank into the injector.
9. Disconnect the tube from the injector, and connect the Ink Supply Tube of the same color back to the joint.
10. Repeat Step 3 to Step 10 for all ink tanks to discharge all ink in the Ink Supply Tank.
Note
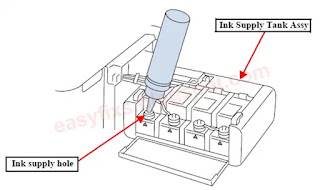
It is recommended that the ink in the Ink Supply Tank should be discharged completely before proceeding to disassembling or reassembling. After all the reassembling work is complete, the discharged ink of each color should be refilled back to the Ink Supply Tank before performing the adjustment. Confirm the colors indicated on the film of the Ink Supply Tank so as not to mistake them, and make sure to refill each ink back to the correct tank from the corresponding ink supply hole.
It is recommended that the ink in the Ink Supply Tank should be discharged completely before proceeding to disassembling or reassembling. After all the reassembling work is complete, the discharged ink of each color should be refilled back to the Ink Supply Tank before performing the adjustment. Confirm the colors indicated on the film of the Ink Supply Tank so as not to mistake them, and make sure to refill each ink back to the correct tank from the corresponding ink supply hole.
Service Manual
Pages: 76 pages
Revision: B
Date of issue: September 6, 2012
Download manual: Epson L110, L111, L210, L211, L300, L301, L350, L351, L355, L358 Service Manual Rev. B
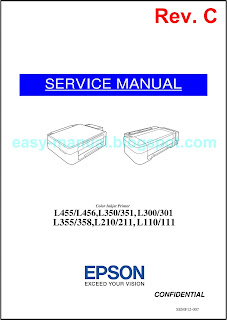
Epson L110/111, L210/211, L300/301, L350/351, L355/358, L455/L456 Service Manual
Pages: 80 pages
Revision: C
Date of issue: June 26, 2014



hello
ReplyDeleteneed service manual for epson l382
Sorry I don't have
Delete